Click on the link above for your free download pattern pack.
Have you had that burning desire to create your own quilting batik wax stamps? Have you been looking for wallpaper border stencils? Do you need something special for this 4th of July scrapbook photos?
Well, we have what you want — and its absolutely free!
Our LSIrish July 4th Freebie Pattern Package includes 4 small quilt square motifs, 4 large quilt square motifs, and 3 star border motifs. Plus you will find fabric idea samples and a simple Nine Patch quilt layout for your personal use.
Hope you have fun with this one! And, please, email me through our contact page, above, with photos of what you have created.
Introducing Two New Free Online Series of Free Carving, Pyrography, and Craft Projects ….. Great Book of Free Carving Projects & Patterns by Lora S. Irish Great Book of Free Pyrography Projects & Patterns by Lora S. Irish …..
PLEASE BOOKMARK THIS PAGE – ADD US TO YOUR FAVORITES!
Stop by often at our carving, pyrography, and craft pattern site, ArtDesignsStudio.com to see what Great New Books you can have for free for Carving Patterns, Pyrography Projects, and Craft Designs by Lora Irish!
Great Book of Free Carving Projects and Patterns by Lora S. Irish Online Series
The first release in my new, free online series is an in-depth tutorial on how to carve the wood spirit face using the planes of the human face as our guidelines. Join me as we work through the detailed steps and 199 photographs to learn how easy the Wood Spirit is to carve.
So, Gang, pull up your chair to your computer screen seat at my class table, and let’s have some FREE FREE FREE wood carving, and pyrography fun.
Lora S. Irish, June 01, 2015
Copyright, Lora S. Irish, 1997 – 2015 Art Designs Studio.com, 1997 – 2015 All International Rights Reserved Use of any information, images, or text in digital or printed format or in any magazine, book, or booklet is strictly prohibited without the written, hardcopy permission of the author, Lora Irish.
This is new work, created after May 2013, by Lora S. Irish. Use in part or whole by any publishing company is strictly prohibited without a written, signed, and dated contract for this new work with the author. June 01, 2015
Today’s session of our Free Online In-depth wood carving Winter 2014 Seminar, taught by Lora Irish, wood carving and pyrography book author and line art pattern maker, will focus on the hand positions and knife cutting positions for chip carving.
As a small treat I have posted my favorite shortbread cookie recipe that I use with my handmade chip carved cookie presses. Hope you enjoy them as much as my family does.
Basic Hand Positions for Chip Carving
How you hold your knife and how you rest your hand against your chip carving wood project determines the angle of the chip walls. Let’s look at the basic positions used to create the angle and depth of your cuts.
Lay your chip knife into the palm of your hand, with the top edge of the wood handle in the bend of your index finger. The handle crosses the palm along the natural fold of the palm. Keep a light, loose grip. Too much tension on the knife can make large cuts difficult to execute and will cause your hand to tire quickly.
Three and Four Sided Chips
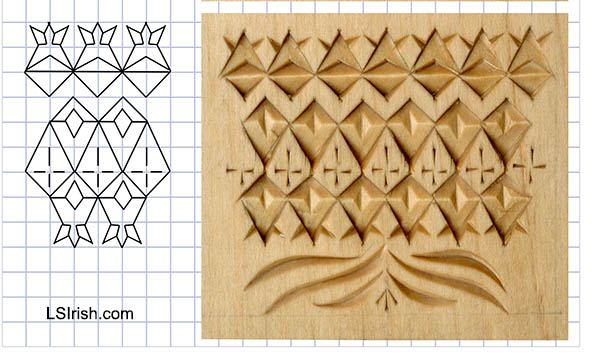
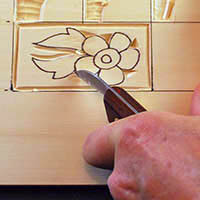
The three-sided triangle chip is the most common cut chip in this wood carving style. The knife is held at 45 degrees to the wood as it is pushed into one leg of the triangle. The point of the blade cuts to the center point of the well inside the chip. In the photo, the black dot in the center of the triangle pattern is the point of the chip well.
Straight-wall Chips
Straight-wall chips have two sides of the chip cut with the knife between 85 to 90 degrees of the wood. The intersection point of these two sides creates the deepest corner of the chip. The knife is places with the point of the blade at the corner point of the two straight sides, then pushed into the wood.
Sloped Floor to Straight-wall Chips
To create the sloped floor of the straight-wall chip the knife is dropped low to the wood. Slide the blade point into the straight-wall corner, thinly slicing the third side of this chip. For large straight-wall chips I use a detail wood carving bench knife, instead of my large chip knife. The added length of the bench knife blade allows me to drop the cut dramatically.
Curved-edge Chips
Many designs have curved-edges to some of the chips. Curves are cut by changing the angle of the knife from the wood as you move the blade through the curved line. Begin with your knife held at a 45 degree angle to the wood. As you pull the knife towards the center point of the pattern line, gradually drop the angle of the blade to the wood – close to a 30 degree angle. To work the second half of the pattern line, gradually raise the blade back to the 45 degree position.
Changing the angle as you pull through the stroke enables to blade point to reach the center point in the chip well.
Free Form Lines
Free form lines are made using two side cuts instead of the traditional three or four-sided chips. This creates a v-trough line that begins at a fine point, widens at the center point of the line, then narrows back to a point. Use the same knife angles as you would for a curved-edge chip.
Sample Chip Carving
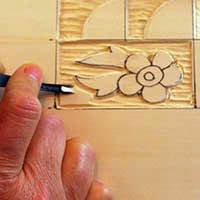
The chip carving sample, shown right, uses all of the basic chip styles – triangle, square, straight-wall, curved-edge, and free form. You can see how the angle of the blade to the wood determines the slope of the chip walls.
As a fun note, the bottom three large leaf-shaped cuts are cut as a curved-edge or free form chip. This type of chip was very common during the early 1900’s and often called Spoon Carving.
Positive and Negative Space
The areas that you cut in a chip carving are called positive space – these areas have actually been worked. Those areas that you do not cut and that are left at the original level of the wood are called negative space – space you have not cut.
You can dramatically change the look of any chip carving pattern by controlling the positive and negative space in the design. In the photo sample you can clearly see a zig-zag pattern beneath the top border chip carved pattern. The dramatic shadows inside of the straight-wall chips in the rows above and below this un-carved line makes that zig-zag prominent. In the large border pattern, below the zig-zag, an inverted diamond has been left un-carved. Again, the shadows of the straight-wall chips that surround this area brings that diamond visually forward. The small cross pattern inside the un-carved diamond was made using a push stroke with the stab knife.
Today’s Free Chip Carving Patterns by Lora Irish from LSIrish.com.
Click on the image, right, for a full-sized printable pattern.
Here’s your treat for today! Over the weekend please gather your supplies – basswood practice boards, chip carving knives, removable spray adhesive, 320-grit sandpaper. On Monday, January 20th we will begin cutting the sample patterns using the six types of chip carving cuts – triangle, square and rectangle, straight-wall, curved-edge, free form, and accent chips.
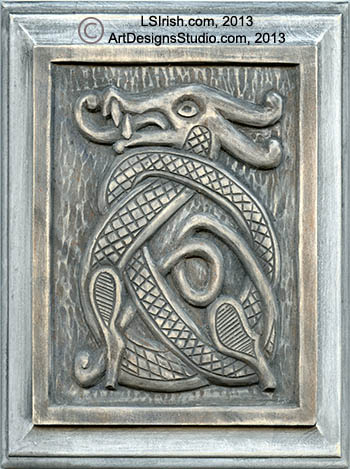
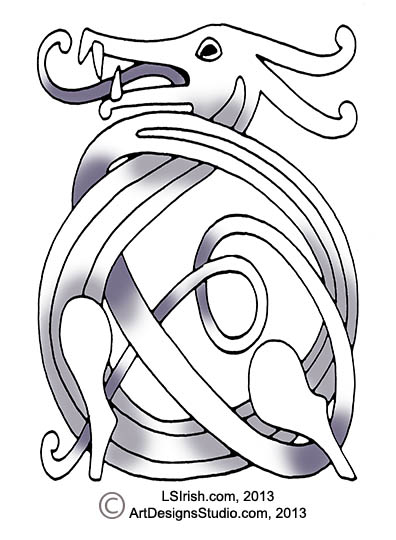
This quick, easy, and fun Celtic Dragon pattern is perfect for your first endeavor into relief wood carving. It uses a very basic set of carving tools, a bench knife, and a pre-routed basswood plaque. Your dragon carving can be completed in just one weekend.
Over the next several days I will be posting all of the step you need to create your own Celtic knot relief carving project. Please bookmark our blog so that you don’t miss any of the fun. I hope that you will share this link on your favorite wood carving forum or message board.
Please take a moment and download our free PDF e-book, Your First Carving. This is an in-depth look at the woods, tools, terminology, and techniques used in relief wood carving, written and shared by Lora S Irish.
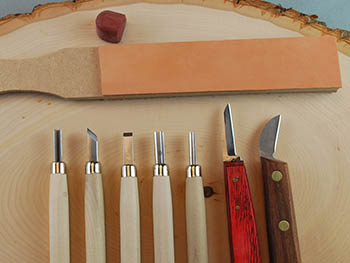
8” x 10” x 3/4” (203 x 254 x 19mm) router-edged basswood plaque Bench knife Large and small round gouges Wide sweep round gouge V-gouge Straight chisel U-gouge Sharpening tools and strop 220-grit sandpaper Graphite tracing paper Painter’s tape Pencil Ruler and/or compass Soft, clean cloth Stiff toothbrush or brass wire brush Thick terry cloth towel or non-slip mat Depth Gauge
Preparation of the carving board
1. Most of the supplies used in this project can be obtained online at your favorite wood carving supply house, through Amazon.com, or at your local large craft store. The sandpaper, painter’s tape, ruler, compass, and brass wire brush are available through most hardware stores.
2. Using 220-grit sandpaper lightly sand your plaque, working the sandpaper with the grain of the wood. Avoid sanding against the grain or in circular swirl strokes. This will leave fine scratches that can appear during the painting and staining steps.
3. Sand again using 320-grit sandpaper. Remove all of the sanding dust using a dry, clean cloth.
Transferring your Pattern
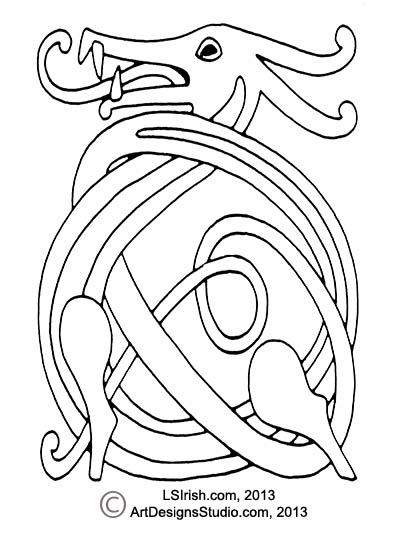
Click on the pattern images to the right and save a copy to your Desktop. Print one copy of each pattern – the outline tracing pattern and the shaded contour pattern.
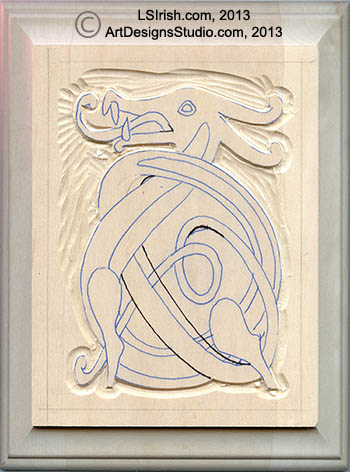
Center the pattern to the board, secure one side using painter’s tape. Slide a sheet of graphite paper under the pattern paper with the graphite side against the wood. Using an ink pen and light hand pressure trace along the outer boundary lines of each element of the dragon. Remove the pattern and graphite papers.
For this carving I am using a nice quality Japanese carving tools set which includes a large round gouge, small round gouge, straight chisel, skew chisel, and v-gouge. Carving tool sets can cost between $25 per set up to several hundred dollars. I strongly advise any beginner to start with an inexpensive tool set while you discover which style of wood carving will be your favorite.
1. Mark a 1/4″ margin using a pencil and ruler along the outer raised carving area of your plaque. This 1/4″ area will remain uncarved, at the original level of the wood. During the next two steps treat this margin line as if it were a boundary line to your pattern.
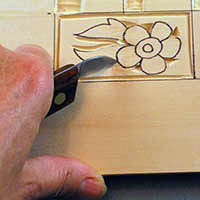
2. This project begins with dropping the background area of the plaque to free the dragon pattern for carving. With a bench knife or large chip carving knife, cut along the outer boundary lines of the dragon pattern. Hold the knife vertical to the wood and slowly pull along the tracing line. Stop cuts are made in several shallow cuts instead on one deep lunge of t he knife tip.
3. Using the small or large round gouge, rougehout the background. Lay the center of the gouge about 1/2″ to 1″ from the stop cut tracing line. Glide the gouge into the stop cut. This will release a small chip of wood.
1. The background rough-out step begins with a stop cut made with a bench knife or chip carving knife.
2. Hold the knife vertical to the wood and make several shallow cuts along the tracing lines.
3. Use a round gouge to carve from the background area into the stop cut line at the pattern edge.
4. The rough-out stage may take several layers of round gouge cutting. As you deepen your background re-cut the stop cut along the outer pattern line to slowly drop the straight-edged wall along the dragon. My final layer of round gouge cuts was worked with the grain (vertical to the plaque) to set all of the carving strokes in one direction. More about Background treatments for your relief wood carving.
Determining the depth of your relief carving
The depth of your carved background and carved design is determined by how thick your carving board is. As a general rule the carving is cut to approximately 1/2 the depth or thickness of the wood at the deepest point. For a 3/4″ board this makes the background drop about 3/8″ deep. More about Determining the depth of a carving.
Please join me tomorrow, November 16, 2013, as we work through the shaping and contour steps for this Celtic Dragon Knot pattern. Thank you, Lora Irish
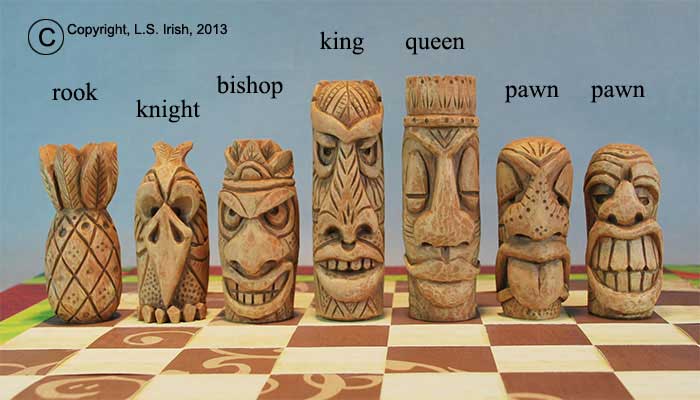
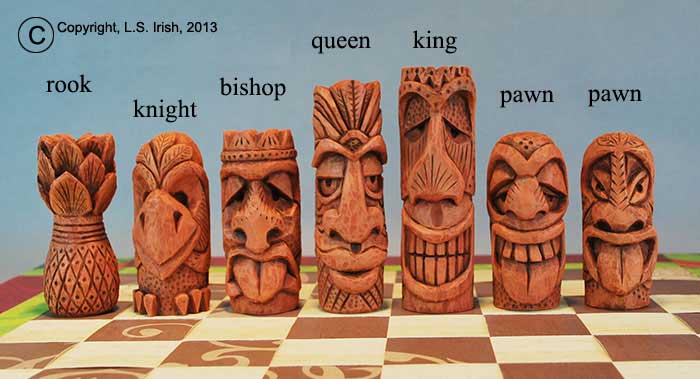
In depth, step-by-step, how to wood carve your own unique Chess Set.
Download your free wood carving pattern package on the project page!
This one is perfect for the brand new beginning carver to walk through the simple cutting steps. For you seasoned whittlers the Tiki theme is great for innovation, experimentation, and creating your own unique chess pieces. Each piece has taken me about one evening’s session to create.
So get your tool kit out. You will need a bench knife, 3/8″ round gouge, 1/8″ round gouge, and your favorite v-gouge. Bring your carving glove, thumb guard, a compass and pencil, a little sandpaper, a set of rifflers, and, of course, your strop and rouging compound.
The set is worked on 1 1/4″ square by 3″ basswood and 1 1/4″ square by 4″ basswood blocks. The patterns can easily be re-sized to fit other square dimensions and these Tiki’s would make great cane toppers or walking stick tops.