The eyes of any portrait are the primary focal point, they are the first area of the face that you see. Let’s look at the simple steps that create a realistic impression for adding coloring to the eye area.

Before you start the actual painting steps take a moment and explore with your fingers exactly where the eyes fall within the face. Start by placing your have flat against one side of your face on a cheek ridge. allow the side of your hand to touch the side of your nose and the palm of your hand to touch the side on your chin.
Right away you can feel that the nose extends beyond the width of your hand, it is the highest point in the face. Your cheek and chin equally touch your hand as they lie at about the same depth in the face. If you have is truly flat you will not be able to feel the eye area, you may be able to feel your eye lashes, but not the ball of the eye. The eye is the lowest, deepest area of the face.
This places the eye in a shadow area caused by the overhang of the upper eye lid, the eye is a half-sphere which lies inside of a bowl-shaped depression.As you work through these simple steps we will add both coloring to the eye and also shadowing to emphasize the half-sphere shape of the eye structure.
Step 1 Applying a base coat of color to the face
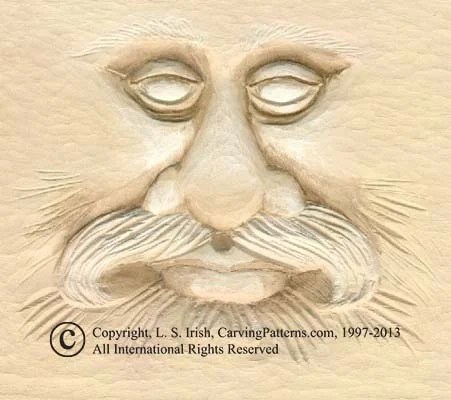
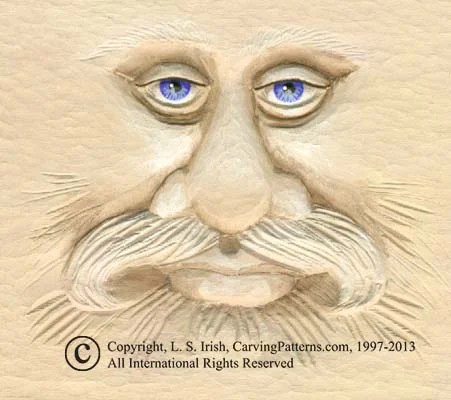
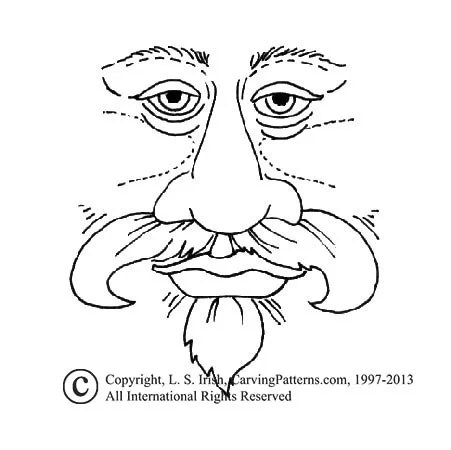
For this tutorial I have created a simple Santa Claus like face carving in a 3/4″ thick by 6″ square basswood board. I have two coats of a base skin color applied. Then I used very thinned burnt umber to shadow the eye lids, along the nose, and under the lower lip. I have also used white to highlight the brow ridge, center point of each eye lid, the nose, cheeks and mustache.
To learn more about skin colors and how to mix your own skin tones please visit Adding Skin Colors with Watercolors.
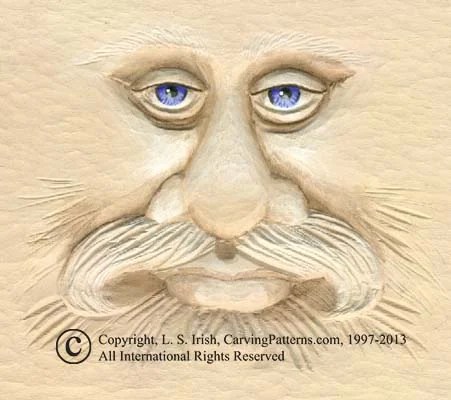
The eye ball has two coats of creamy white, not bright white, applied. When that dried I thinned burnt umber and washed a thin coat to the top 1/3 of the eye ball. In the painting steps this is probably the most important. The eye is not white, it’s off white and too bright a white paint can give your face a startled look. The entire eye structure is always in shadow. The brow ridge over hangs the eye lids and the upper eye lid over hangs the eye ball. That little bit of brown shadow tucks the eye ball into the eye lid area.
Step 2 Establish the shape of the pupil
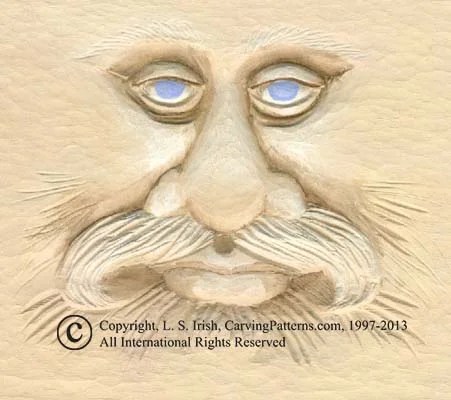
The iris area of the eye is the area that carries the eye coloring of brown, blue, or hazel. It is a circular area with the black pupil centered inside of the iris.
The only time you see the entire iris (colored area) of the eye is when someone is in shock. So 99.9% of the time some part of the iris is covered by the eye lids. If the top part of the iris is covered your face looks straight at you. If the lower section is covered he is looking down. I have used a medium blue for the iris and I have pulled a burnt umber line under the edge of the upper eye lid.
Step 3 Add a shadow to the pupils using a deeper color.
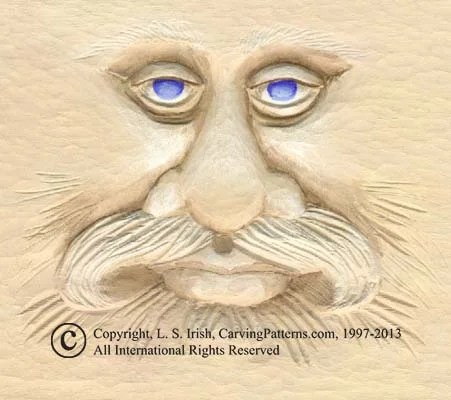
The eyes are a ball inside of the upper and lower eye lids. The eye area lies at the deepest point of the face so the eye is shadowed by the eye lids and by the eye brow ridge. I’ve added a shadow of darker blue to the iris along the upper eye lid to show that the eye ball area lies below the upper lid. The shadow color is about two tonal values darker than the iris color. So if you have used a medium blue for the iris the shadowing is done in a medium royal blue color; if the iris was first painted medium brown use a burnt umber brown for the shadows.
Even if your Santa’s eyes are very small a little line of darker iris color makes the eye more real.
Step 4 Create the radius lines in the pupil

Because my eyes are large I have added a few lines of dark blue radiating into the center of the iris. The iris is not a flat structure, it has ridges and folds that allow the iris to expand or contract. The deeper fine lines give this gathered or folded look to the iris.
Step 5 Adding the black iris circle and the white highlights
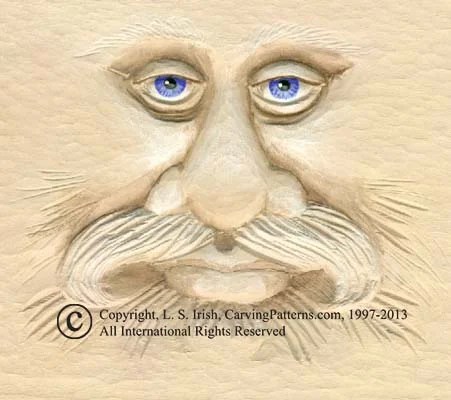
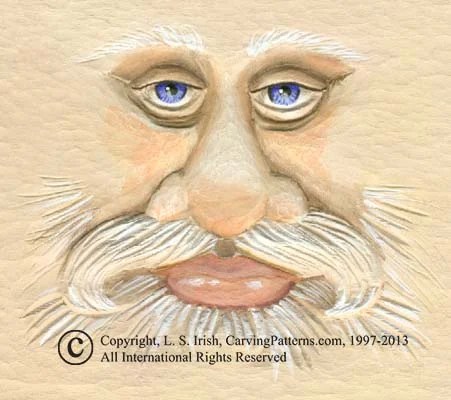
The end of a large brush handle dipped into your paint makes a perfect circle when just lightly touched to your carving. Look through your brush kit and try several handles as you probably have a variety of possible circle sizes. A little sand paper used on the brush handle can enlarge the circle it makes. Place a small amount of black on your palette. Tap the handle of the brush into the color then tap that color into the center of the full circle of the iris. Note in the photo the iris lies near the upper eye lid as this is where the center of the iris’s full circle falls.
The eye now has a nice circle of black for the pupil, a smaller circle of medium gray at the bottom of the center of the pupil and a white highlight. On small eyes I would not bother with the gray highlight. The eye surface is shiny – glossy. The white highlight shows this glossy look. The highlights of both eyes fall in the same position.
Step 6 Outline along the edge of the upper eye lid with black
I have added a black line along the upper eye lid. If this was Mrs. Clause I would add a few fine eye lashes on the outside of the eye lid. The bottom eye lid is not outlined. This black outline emphasizes the overhand of the upper eye lid.
Step 7 Accent the sides of the pupil with black
Because my eyes are fairly large I have added a thin line of black along the sides of the pupil, don’t completely encircle the pupil. These small arcs along the sides of the iris add to the shadowing from the upper eye lid and eye brow ridge.
Step 8 Add the blush to the upper eye lid creases, the cheeks, and the tip of the nose
Since we have worked to create realistic like eyes in the carving, let’s take a moment to complete that effect by adding blush and lip coloring.
I’ve added the blush to the cheeks and the tip of the nose. There is also blush along the side of the nose near the eye corners and on the bottom side of the brow ridge – just above the upper eye lids. Blush is often a shade of orange, not pink, and is applied as a wash coat of one-half water to one-half paint. Lips are also a shade of orange or orange brown with the upper lip slightly darker in tonal value, as it is shadowed by the overhang of the nose, than the lower lip. A touch of thinned white to the lower lib gives that mouth a glossy look.
Step 9 Wood staining the finished carving
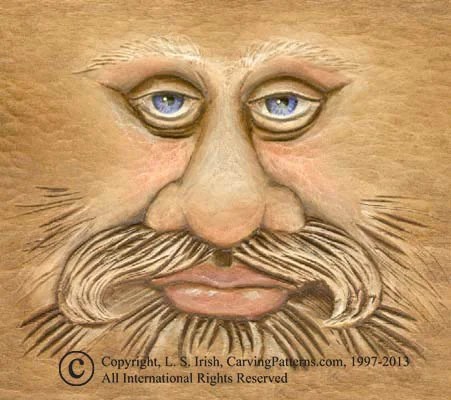
Since this sample was worked on a basswood carving, to complete the work I have allowed the coloring to dry overnight. Two to three light coats of polyurethane or acrylic spray seal is applied to seal the coloring. After the spray sealer had dried completely the wood carving was stained using a medium umber brown. This staining added the last dark shadowing around the half-sphere of the eye ball as well as accents the v-gouge lines in the beard and mustache. When the stain had dried, several days, another light coat of spray sealer was applied.
This pattern is offered courtesy of Art Designs Studio and for Personal Use Only.
