The features of the human face can seem overwhelming as a carving subject for a beginner, but if you first divide the face into flat planes you will discover how simple it is to create the classic Wood Spirit. I am starting this online, free project, by exploring the angles and planes in a human face and how that relates to the first cuts that you make in your Wood Spirit. The photos used in this tutorial are courtesy of MorgueFile.com.
Photo One: The angle of the flat of the face from the front point of the chin.
The lines of the chin line, nose, and front facial plane create two distinct angles. The line from the bottom of the ear to the tip of the chin marks the change from the face into the neck area.
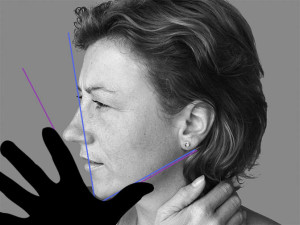 If you open your hand and place your thumb against the bottom of the chin line, resting the chin in the angle of the thumb and hand,then touch the tip of your nose to your extended first finger you find an angle near 90 degrees.
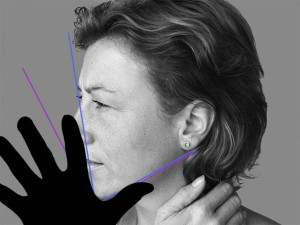 If you repeat this hand position against your face, with the extended finger resting at the bridge of the nose you discover a much tighter angle, approximately 70 – 75 degrees.
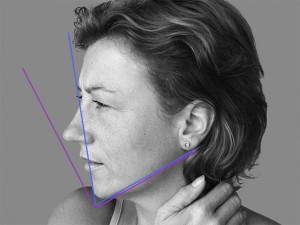 By using the front point of the chin we can determine the angles needed to allow enough room in our Wood Spirit carving for the nose to project beyond the flat plane of the face.
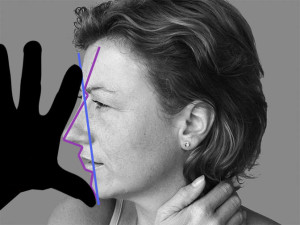 Photo Two: The angle of the front of the face, chin to forehead
For this set of photos, place the pad of your thumb against the bottom edge of the chin point. Reach with your index finger towards the forehead. Note that your nose touches the first joint of the finger where the finger begins at the top of the palm.
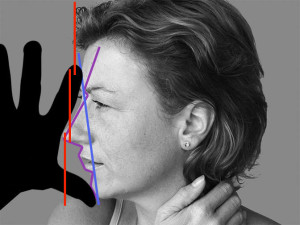 The facial features of the human head take up only 2/3’s of the full skull area. In this photo, follow the red lines which mark the top 1/3 forehead and hair-line area, the second 1/3 which includes the eye brow ridge to the tip of the nose, and the last 1/3 which takes in the tip of the nose to the bottom of the chin line.
In both of these photos, above, the blue line shows the flat plane of the front of the face. The purple line lets us see how each area of the face either extends beyond this flat plane or drops behind it.
Note that the center point of the brow ridge, the outer edge of the nostril, and the center point of the front chin all align.
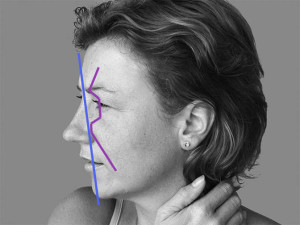 Photo 3: The angles of the eye and cheek of the human face
In this photo the blue line shows the flat plane of the front of the face. The purple line shows the angles and depth of the brow ridge, eye socket, cheek, and the corner of the mouth. Of note is that the eye socket is a flat plane the reaches from above the upper eyelid to about 1/2″ below the lower eyelid. The roundness of the cheek does not fall directly below the eye, but instead below the center of the nose ridge.
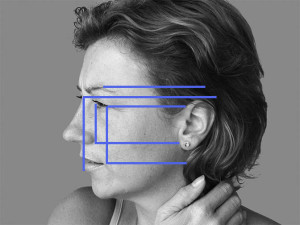 Photo 4: How the facial features align.
One of the most fascinating parts of carving a human face is how wonderfully all of the features align with the other features.
Note that the nose bridge is straight to the outer most point of the lower lip.
Note that the outer edge of the eye-ball is in a direct, vertical line to the outer edge of the nostril.
Note that the corner of the eye lid is in alignment with the corner of the mouth.
Note that the nose bridge is level to the top of the ear, and that the eye aligns with the first inner roll of the ear. The bottom of the nose aligns to the center of the eye lobe.
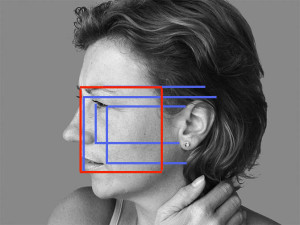 Photo 5: The near perfect square of the profile face.
Here I have drawn a line along the front edge of the hairline. You can see that the skin area of the face, in profile, creates a near-perfect square.
Photo 6: Using these planes to carve a Wood Spirit.
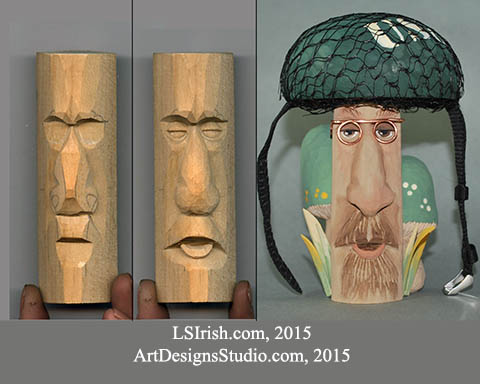 The composite photo, above, shows three stages of this Wood Spirit carving. The first, left, shows how the planes of the face are first established in the practice stick. The center photo shows the development of the individual features for our Wood Spirit. The third shows the finished carving.
As we work together through this free, online Wood Spirit Carving project, I will teach how to determine where each plane should lie, how to cut those planes, and then how to shape the planes into individual features.