
Basics to Scroll Saws
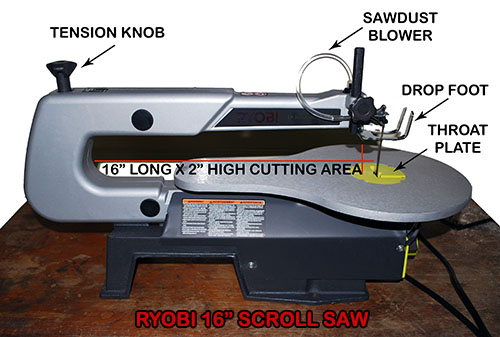
During this session we will take a quick look at the features of a basic scroll saw, and walk through the steps to changing your scroll saw blade. The scroll saw shown is a Ryobi 16″ variable speed.
Cross-Crafting Seminar Introduction
Cross-Crafting Seminar Supply List
Cross-Crafting Seminar Free Patterns
Cross-Crafting Seminar, Scroll Saw Basics
Cross-Crafting Seminar, Setting Up Your Scroll Saw
Cross-Crafting Seminar, Scroll Sawing the Wood Spirit Face
Cross-Crafting Seminar, Wood Burning the Wood Spirit Face
Cross-Crafting Seminar, Colored Pencils for the Wood Spirit Face
 Click on any image for a full-sized picture of that step.
Read Your Manual
Begin by reading the information and instruction manual that came with your particular scroll saw, especially the safety steps.
- Wear safety glasses.
- Use the correct blades made for your specific scroll saw.
- Check the condition of your saw blade before you begin any working session.
- Always know where your fingers are in relationship to the saw blade.
- Unplug the saw and remove the Child’s Safety Plug when not in use.
- Watch for physical and visual fatigue – take frequent breaks.
Scroll Saw Features
The Ryobi features a Tension Knob for quick and easy blade tension adjustments on the top back of the machine. The Sawdust Blower keeps the wood clean of sawdust in front of the saw blade. The Drop Foot holds the wood securely to the work table to reduce vibration and the Throat Plate gives you access to the bottom of the saw blade.
 The On/Off Switch is on the lower front of the motor and also contains a Child’s Safety Plug that can be removed to prevent the machine from turning on.
The three pronged knob on the left front controls the tilt angle of the table, called the Bevel Scale. On the right side of the front is your variable speed control. For the Ryobi the speed range is from 550 r/min. to 1,650 r/min.
Scroll Saw Blades
 Scroll saws use two styles of blades – pinned and unpinned. Pinned blades have a small metal cross bar at the top and bottom of the blade that slides and locks into the blade holders. This gives a strong, secure anchor for the blades.
Unpinned blades do not have the cross blades, and are simply straight at the top and bottom.
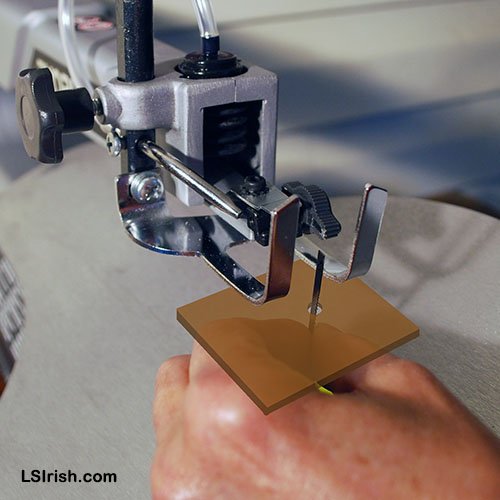 The unpinned blades are used in fretwork where you will be cutting holes into the design. Begin by drilling a small hole, just slightly larger than the width of your saw blade, inside of the shape that you will be cutting. Release the Tension Knob on the top of the machine. Release the top Blade Holder Knob. Remove the top of the blade from the scroll saw. Slide the wood over the top of the blade, threading it through the drilled hole. Secure the top of the blade by tightening the Blade Knob and Tension Knob.
Saw blades are sorted by the number of teeth per inch, TPI. The Ryobi Specialty Scroll Saw Blade Set gives you three sizes – 7 TPI Hook Tooth for thick widths of wood, 15 TPI Regular Tooth for general cutting, and 18.5 TPI Skip Tooth for fine and tight turned cutting. For our projects in this seminar I used the 15 TPI regular tooth, pinned blades.