Supplies: 14″ square of unbleached muslin large embroidery hoop embroidery needles your favorite shade of red embroidery floss Christmas Calicos angel pattern scrap booking gel pens white acrylic craft paint embroidered rose accent
Our great-grandmothers didn’t have acrylic paints and gel pens in their embroidery craft kit but we do!
So after you have finished your embroidery stitching get them out onto your craft table and have fun adding bits and accents of bright colors to the inside areas of your design. You can use layers of gel pen colors to create intense color tones, add darker or lighter shades of gel pen over an area to make highlights and shadows … and even use different colors to make your own calico fabric patterns.
Some pale gel pens do require multiple colors. For my white I chose to use acrylic craft paint.
If you get a little out of the line with the gels or if you have small openings in your stitch word, use a matching red gel pen to go over the embroidery floss. Use embroidery patches, accent flowers, small bows and ribbons, and even tiny buttons to dress her up.
Once everything is completed and your redwork angel has dried over night, give it a nice ironing to permanent set the colors. She is ready for her permanent hoop frame and to be placed on your mantel !!!!
Redwork Embroidery Patterns and Redwork Embroidery Quilts
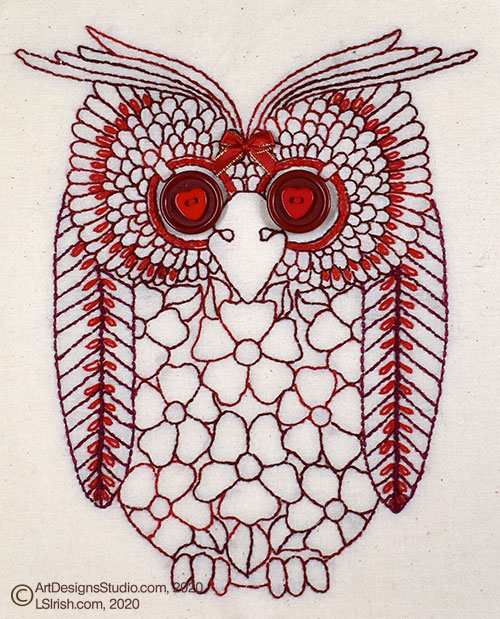
Let’s take a 1740 discovery, an 1920’s embroidery style, a 1950’s Retro Owl pattern, and today’s trends of adding establishments to our needle arts and see what we come up with.
Around 1850 in the United States the Redwork embroidery style began because of an amazing process that created a colorfast red dyed for cotton fibers. Colorfast means that the dye in the thread would not fade, wash out, or cause the dye to bleed onto the background fabric.
Today, Redwork is seeing a serge in popularity and has begun branching out from traditional, vintage, and antique patterns. My owl is worked, centered, on a 16″ square of muslin, which fits a 12″ frame and allows extra fabric to turn over the frame’s backboard. The owl pattern measures 9″ high x 8″ wide.
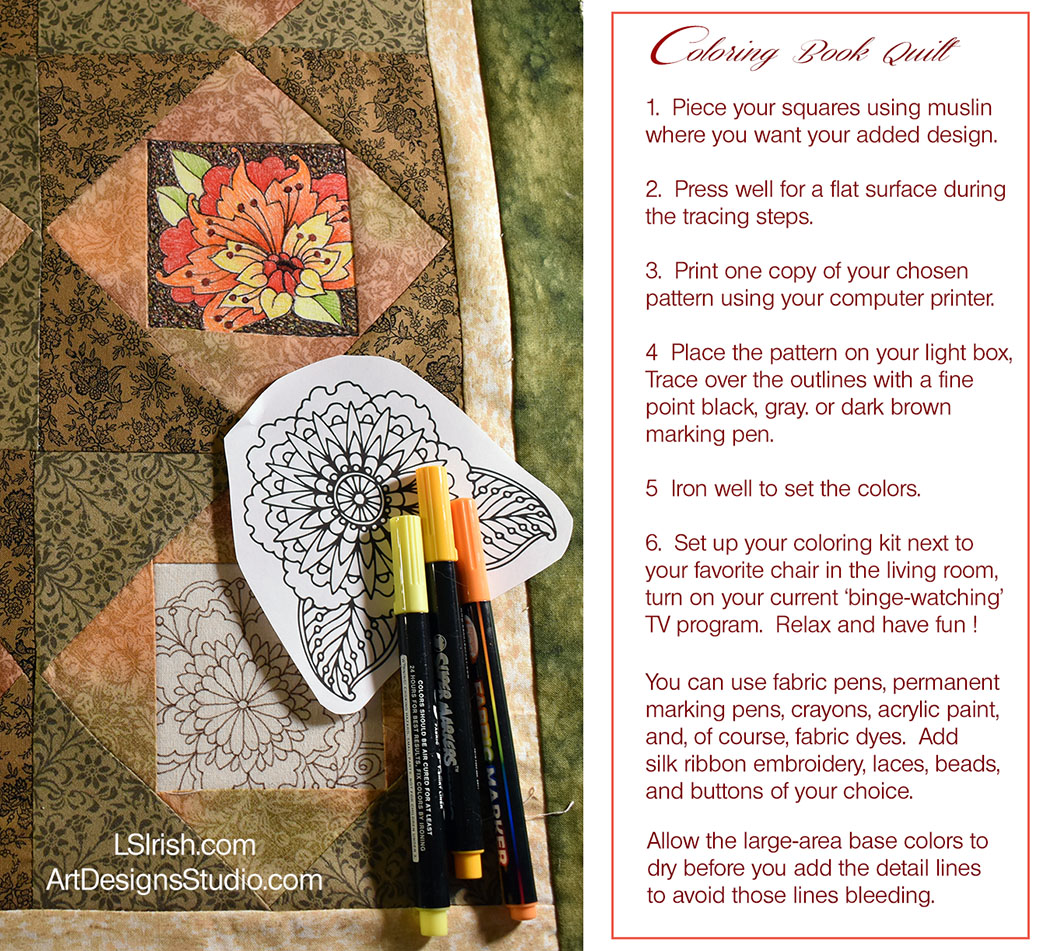
That perfect quilt square is easily in reach if you have just a yard or so of muslin, permanent marking pens, crayons, fabric paints, or even silk ribbon … and ArtDesignStudio.com pattern packs.
Can’t find that exact fabric pattern that you are craving? Can’t find it in the exact colors that you need for your latest quilting project? No problem … color your own!
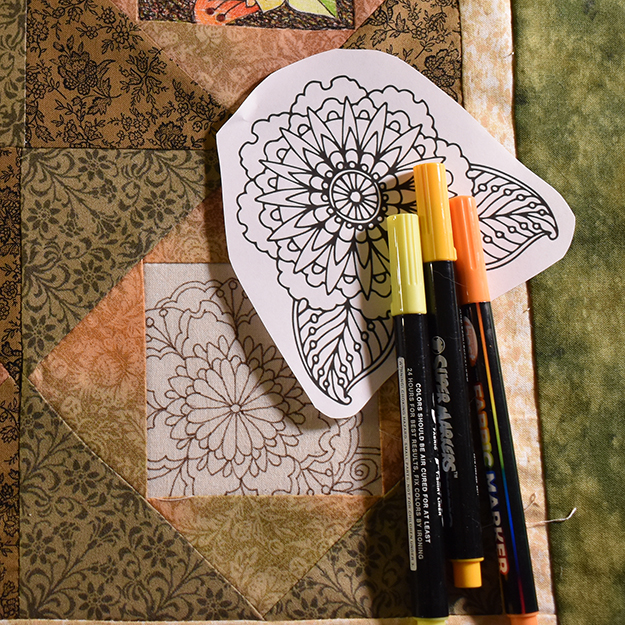
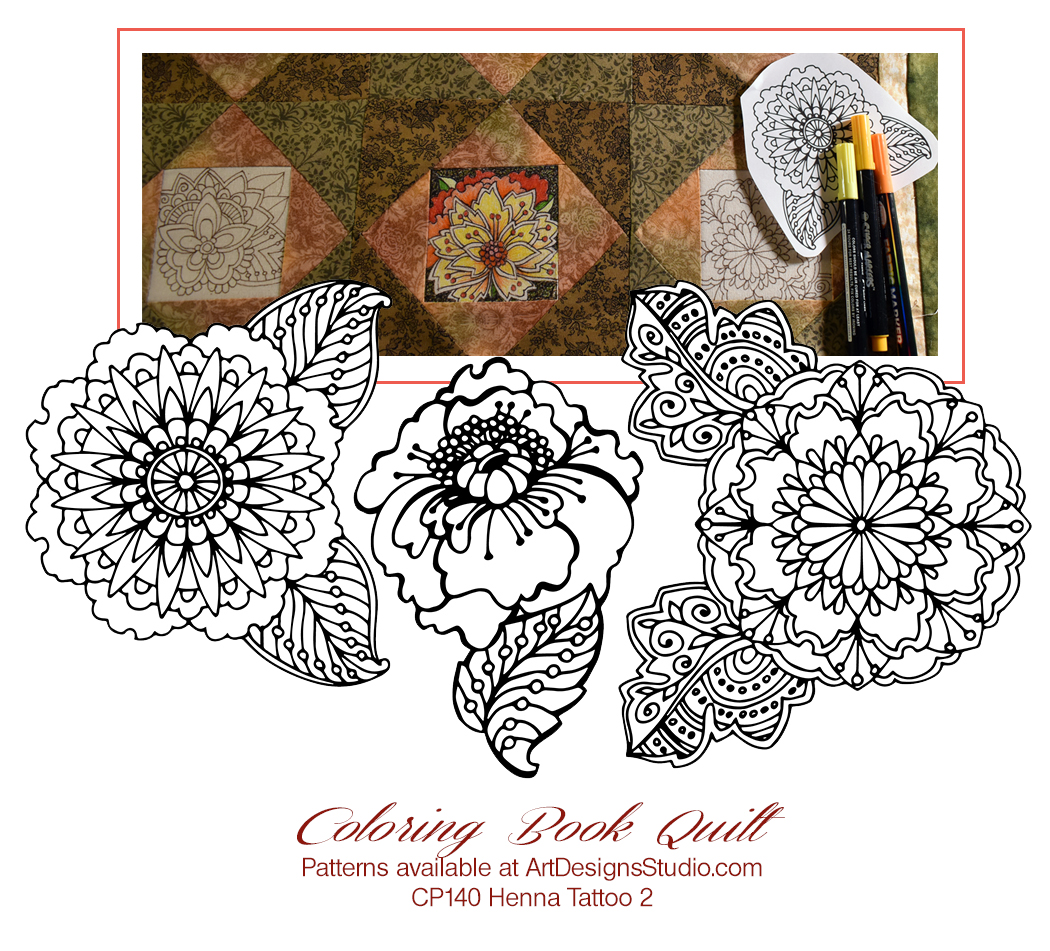
I chose Henna Tattoos for my table runner Coloring Book Quilt. But any idea goes – wildlife, Celtic, dragons, steam punk. ArtDesignsStudio.com has over 140 pattern packs full of ideas, ready for you to download today.
1. Piece your quilt squares using muslin where you want your coloring Book design.
2. Press well so that you are tracing on a flat surface.
3. Print one copy of your chosen pattern using your computer printer.
4. Place your pattern on your light box. Trace over the outlines with a fine point permanent marking pen of black, gray, or dark brown.
6. Set up your coloring kit next to your favorite chair in the living room. Turn on your current ‘binge-watching’ TV program. Relax, have fun, and color away.
You can use fabric pens, permanent marking pens, crayons, acrylic paint, and of course, fabric dye. Also consider beads, silk ribbon embroidery, lace, and buttons.
Allow the large-area base coats to dry before you add the detail lines to avoid bleeding. Set the colors with a hot iron after you are done.
I have a great email question hit my inbox this morning and thought I would share my answer here.
“What brand of assorted color selection of permanent marking pens & fine point black permanent marking pens did you use. I need pens that do not bleed on quilting cotton, specifically a black pen. I am want to do a Dalmatian Puppy Quilt and need to permanently colour the black spots on to a white quilting cotton.”
Memory Quilt Project
A Memory Quilt is a fantastic way to record special events, special dates, and special loves that are important to you. They are easy, and quick to create using permanent marking pens!
Memory Quilts can become a project for your entire family or friends by holding a Quilting Party. Make up the large white squares with the pattern and doodle fills completed. Then put the squares out of your table with a pack of assorted fine point pens so that everyone can add their own drawings, signatures, or little sayings. After the event, simply finish the quilt, memorializing the event.
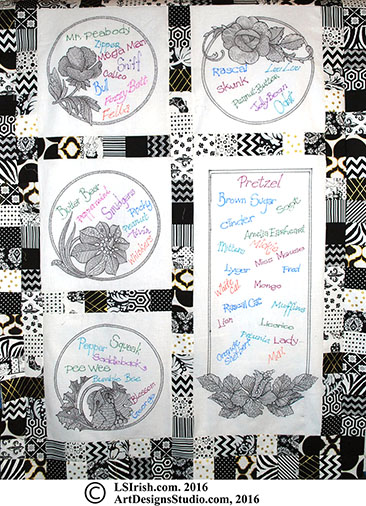
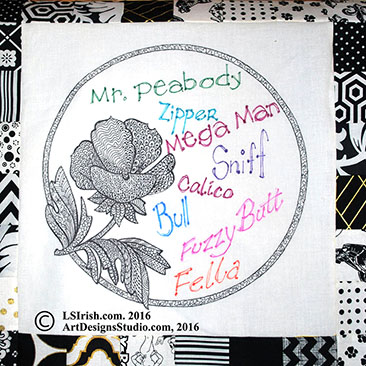
My Memory Quilt came about because my son ask me what the name of one of our past cats was … “the one that was marmalade colored with three white paws?” That started the ‘how many pets have we had in our 42 years of marriage’ naming contest that evening. The list became so long that I finally had to write the names down so that we didn’t miss any of our beloved friends and didn’t start repeating names.
(While you may know me as a pyrographer and wood carver, my neighbors know me as ‘that cat lady!’ But I plead not guilty as a cat hoarder as all of our friends through all of our marriage have been spayed, neutered, and had their regular vetting and pet vaccinations! Besides, the biggest pride I ever had at one time was 21, as we somehow ended up with three stray Mommas that wandered onto the back porch, which, of course, came pregnant!!! And THAT wasn’t my fault.)
So, in answer to the email question, I personally use Sharpies! They come in both fine point and wide point with a nice variety of colors. The pens are very reasonably priced and available just about everywhere.
This marking pen quilt is a new creation for the Great Book of Floral Patterns that is in the process of being revised – and which sadly appears to be currently out of print from the publisher.
The quilt is worked on 12 1/2″ white cotton squares. I printed my patterns, from our Wood Flowers Circle pattern pack, onto regular computer paper.
Next, I taped the printed pattern to my light box and over the pattern positioned my quilt square. The quilt square was also taped to my light box using blue or green painter’s tape, which does not damage the seam allowance of the fabric. When I turned on my light box, the pattern was extremely clear and visible through the fabric so that I could easily trace the outlines of the pattern with a fine point black Sharpie.
And … as I just wanted this quilt to a fun project I used some of my pyrography fill and texture patterns to fill in each area of my design with the same marking pen. See our project, Pyrography Doodles, for fill ideas or you may want our Pyrography Doodles pattern package that has over 300 texture and fill patterns, plus 29 pattern designs.
If your white cotton fabric is thin or heavily starched you may have some slight bleeding. Generally, that bleeding is some minimal that it is not really noticeable once the entire quilt is finished.
When I had all of the large quilt squares completed, I set the marking pen with a hot steam iron. Next, I used my assorted color pack of fine point Sharpies to write the names of all of our furry friends over the years onto the blank areas of each square. Since I know that we will have new friends join our family in the coming years, I have plenty of space to add their names too!
Next, I cut 2 1/2″ squares from a series of black and white fabric to become my small quilt squares. Right now my quilt is waiting for the batting, backing, and free motion quilt stitching.
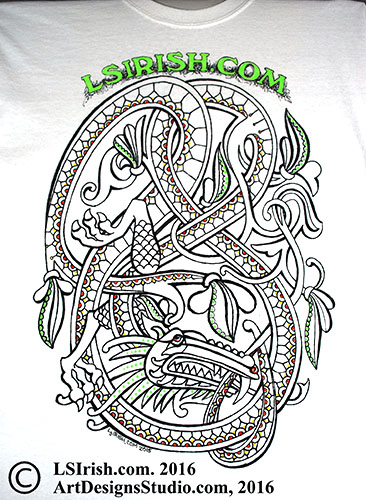
T-shirts are wonderful for marking pens too! This is an extra-large, 100% cotton t-shirt that has been colored using fine point Sharpies. The pattern comes from our Celtic Dragons pattern pack.
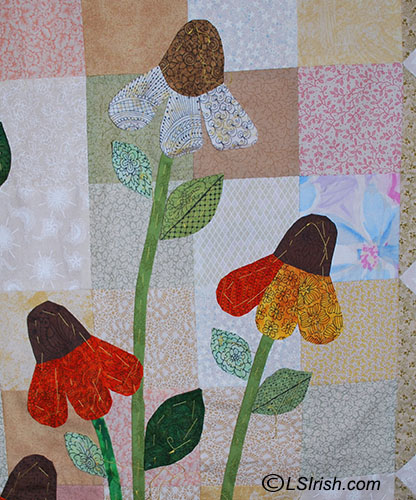
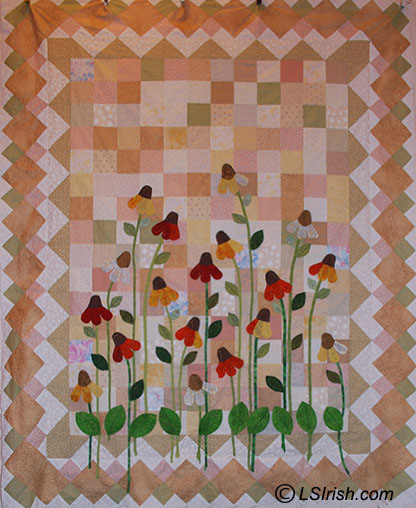
We have been working with doodle patterns in our wood burning and pyrography projects this last week. Today, let’s see what happens when you bring those doodle designs to your favorite applique quilt project.
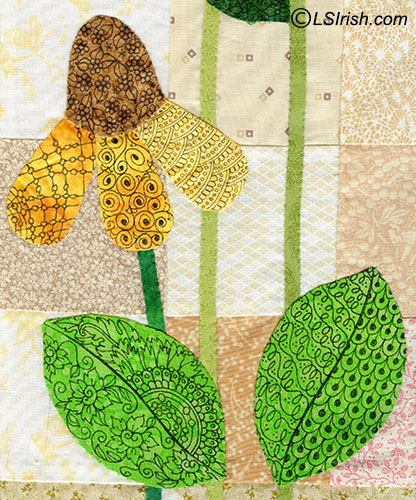
While I have stitched quite a few small applique quilting projects, I have finally started my first full-sized quilt work. I wanted something fun, something easy, but something extra special since I know I will be working on the quilt top for some time. I chose a classic, simple wildflower daisy pattern with long stems and lots of leaves over a four patch neutral toned block pattern.
To add that extra, I chose to get out my fine point permanent marking pen, a variety of tone-on-tone bright cotton fabrics, and the doodle patterns we have been using for our pyrography. This is a great idea for the quilt top that has been lying around the sewing room because you just didn’t feel it had enough pizzazz to finish.
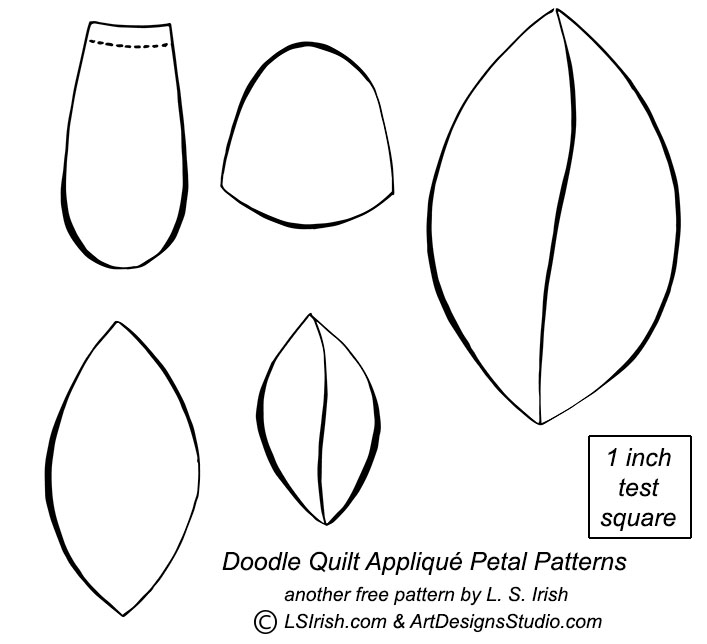
Wash and iron your fabric. Click and save a copy of the free applique quilt pattern. Trace a copy of each pattern piece onto the back of a piece of 220-grit sandpaper. Pin or tack the fabric to a piece of foamboard. Lay the sandpaper pattern pieces on the fabric and trace around the outer edge with a water-soluble pen, allow space between each pattern piece for seam allowances.
Click and save the full-sized pattern above – another free pattern by Lora S. Irish.
Now, using your permanent marking pen, have fun doodling patterns to the fabric. I chose black for my designs, but also consider using multiple colors for pale toned or neutral fabrics. When the doodling is done, remove the fabric from the foamboard and iron. You are ready to move on to your favorite applique technique. Fun, easy, creative, and a one of a kind show stopper.