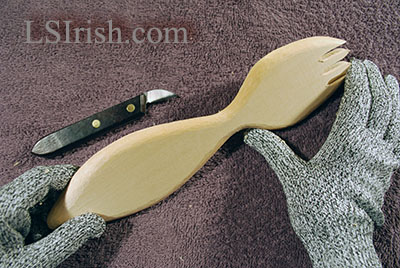
The classic wooden spoon may be the easier beginner’s wood carving project there is. During this session of our free, summer cross-crafting seminar we will work through the wood carving steps to shape the handle and bowl of a wooden fork.
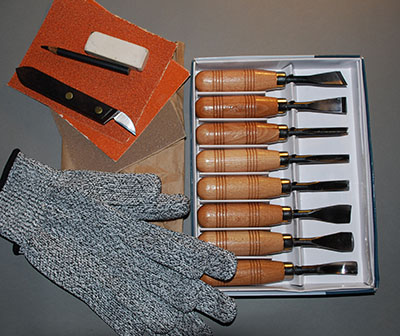
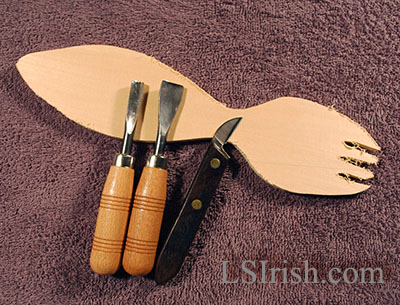
1 – scroll saw cut wooden spoon, slotted spoon, or fork blank wide sweep round gouge narrow, half-circle, bent round gouge bench knife or chip carving knife carving gloves, thumb guard, or heavy terry cloth towel 150-, 220-grit sandpaper 6″ or large square of brown paper bag
Note: Working with the wood grain
As you work through the carving steps for this wooden fork you will need to pay close attention to the wood grain direction in each area of your work. Both the handle and bowl of your wooden spoon are curve-shaped. This means that at the widest point in the curve the direction of your cutting strokes must be reversed to work the knife or gouge blade with the grain. The grain direction of your wooden spoon blank determines the directions of your bench knife and gouge strokes. You want to move the knife so that it runs with the open fiber ends of the wood grain, not into those open fibers.
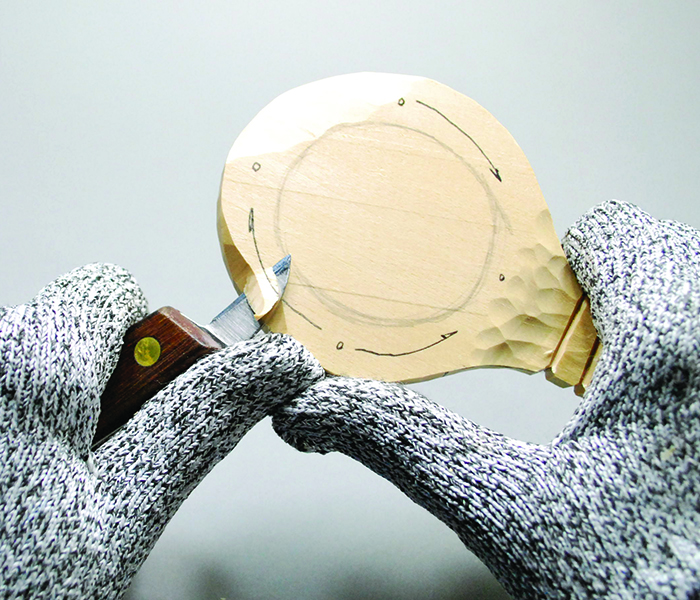
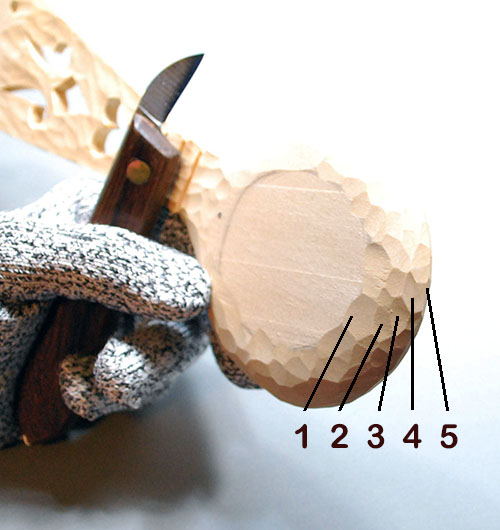
Step 1: Rough-cut the edges of the handle along the back of the spoon.
Begin with your bench knife and using a paring stroke, pulling the knife blade towards you, round over the back edge of the lower section of the spoon bowl. I am using carving gloves in these photos. Gloves are cut resistant not cut proof! So, please, watch carefully how you are holding your knife and where the knife blade will go if the knife slips out of the cut. Often, I carve using thumb guards instead of gloves as they give me more movement in my hands. If you have neither, use a thick terry-cloth towel in your holding hand as protection.
Step 2: Rolling small cut strokes along the edge of the handle.
The sides are round by making many, small paring strokes, worked from the inside area of the handle, moving each new cut slowly towards the edge of the handle. This first series of rounding paring cuts is worked from the center point of the handle towards the top edge of the handle.
You can see the progression of small cuts in this photo. Using a series of small cuts, worked from the center back towards the spoon’s edge creates a true curved edge instead of a lightly rounded sharp corner.
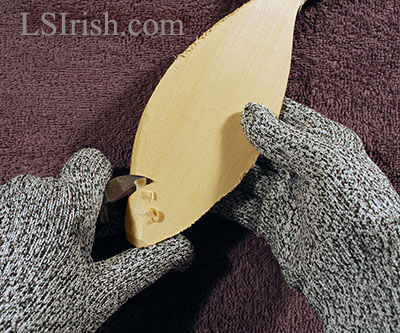
Step 3: Round over the second lower edge of the back of the handle.
Continue working the lower edge of the back of the handle by moving your cutting strokes to the second side of the spoon. The smaller your cutting strokes the smoother the finished edge will be.
Step 4: Work the back handle edge towards the fork’s bowl area with your bench knife.
This rounding process is moved to the front portion of the back of the handle. To work with the grain line of the wood, these cuts are made using a push stroke – pushing the knife blade away from you.
Step 5: Change the direction of your bench knife cuts to match the change in grain direction at the narrow joint between the handle and bowl.
Use a series of short, small bench knife cuts, worked from the center area of the handle towards its outer edge to round over the handle. Stop your cuts where the handle narrows into the fork’s bowl area, as your wood grain direction will change at this point in the blank.
Step 6: Free the cutting strokes at the narrow joint.
Flip your spoon blank in your hand so that you are working the knife from the fork’s bowl area into the narrow joint with the handle. This will bring the cuts from step 6 to meet the cuts you are making now, and free those cuts from the narrow area.
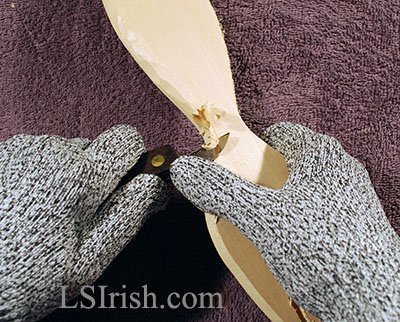
Step 7: Finish rounding over the edge of the back by working the fork’s bowl area.
Continue rounding over the back edge of the fork by working the bowl area with your bench knife.
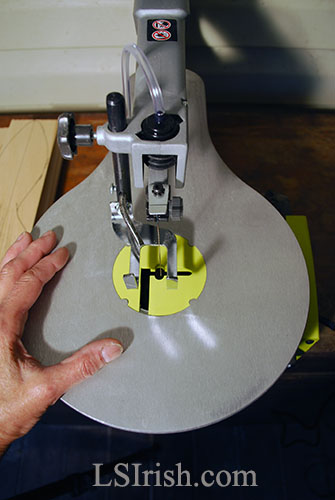
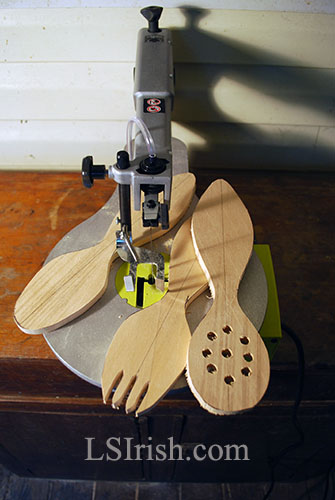
For this section of our summer, free, online cross-crafting seminar we will be cutting out a wooden spoon blank on the scroll saw. Please refer to Cross-Crafting Seminar Free Patterns for a copy of the spoon patterns that we will be using.
Scroll Saw with a 15 tooth, regular cutting blade 1 – 3″ x 12″ x 3/8″ piece of basswood for each spoon 220-grit sandpaper, tack cloth graphite tracing paper safety glasses
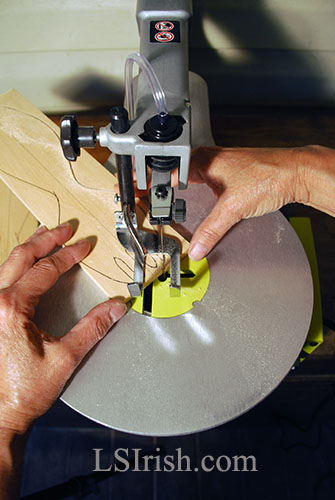
Step 1: Choosing how to rough-cut your spoon blank
There are many ways to remove the waste wood from any wood carving blank. For our seminar I am using my Ryobi Scroll Saw and a 15 tooth per inch, regular cutting blade.
The most simple option is to use your bench knife in either a push or paring stroke to slowly cut away long slivers of wood from the blank. A coping saw or hand-held, u-shaped framed saw and a vise or clamps can also be used. If you plan to make a series of wooden spoons you might want to purchase a small 5″ curved-blade draw knife or 3″ straight-blade draw knife will make the rough-put work quick and easy, especially on thicker blanks.
Step 2: Preparations
Lightly sand your basswood board, both front and back side, using 220-grit sandpaper, remove any sanding dust with a dry, clean cloth. A smooth surface on the wood allows your blank to move easily through the scroll saw cuts. Trace your pattern to the basswood using graphite paper.
Note: If you will be making more than one spoon, trace the pattern to the inside surface of an empty cereal box. Cut the spoon pattern out with scissor and use the cardboard cut-out as a template, tracing along the edges of the cardboard. Save the cardboard template, it can be used over and over again.
Release the Drop Foot and slide your basswood blank under the foot. Reset the Drop Foot knob.
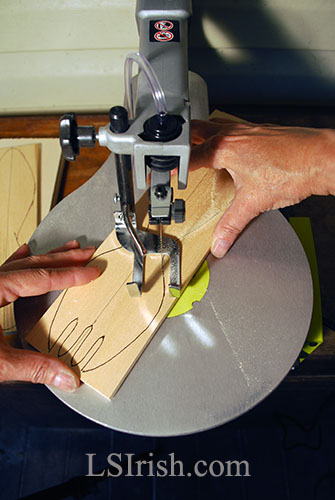
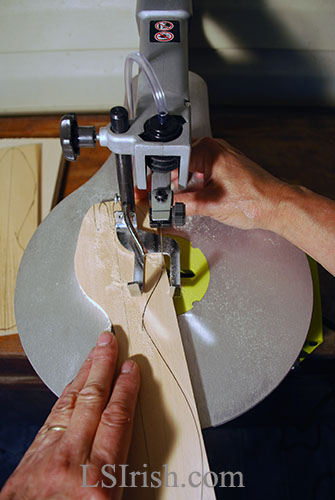
Step 3: Cutting the basic outline
Begin by cutting along the basic outline of your spoon pattern.
Work one side of the spoon at a time, fully releasing and freeing that side of waste wood.
Step 4: Cut the second side of your spoon
Continue your scroll saw cutting to completely remove the waste wood on the second side of your spoon blank.
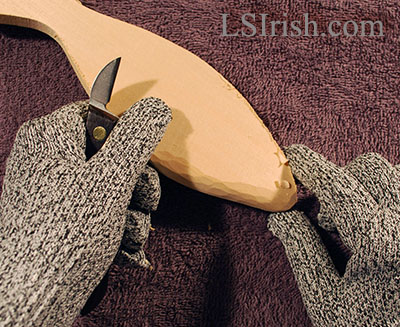
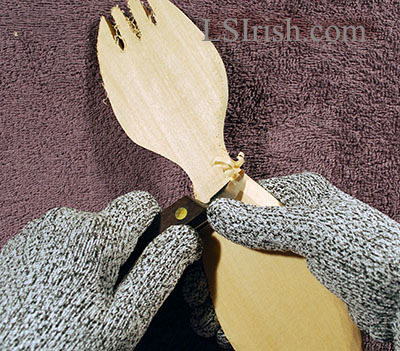
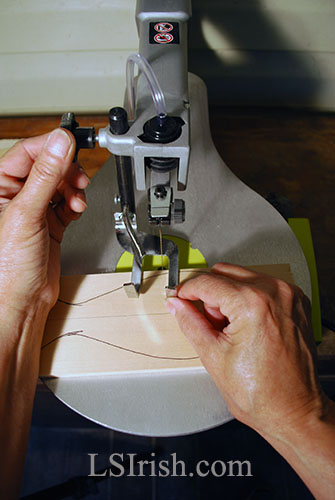
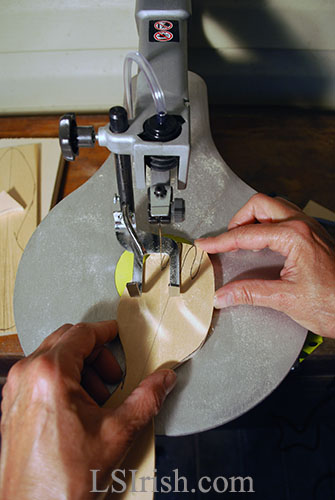
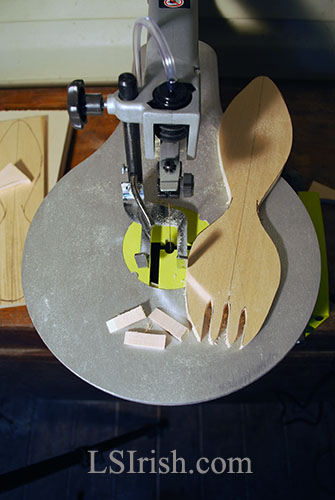
Step 5: Cutting the fork tines
The fork tines are cut in two strokes, each worked from the end of the fork into the opening between the tines. Stop the first cut when you reach the center point of the opening.
Back the saw blade out of the wood and cut the second side of the opening. This two-cut step will free the waste wood between the tines.
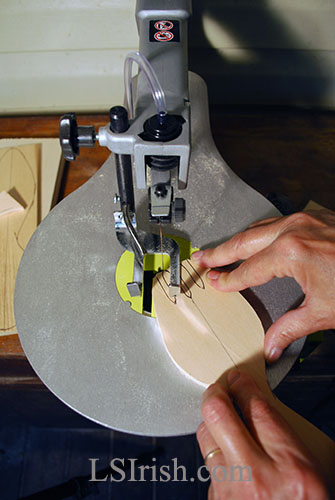
Step 6: The completed scroll saw cut spoon blank
This wooden fork blank took about 15 minutes to cut out on the scroll saw – quick, easy, and super fast!
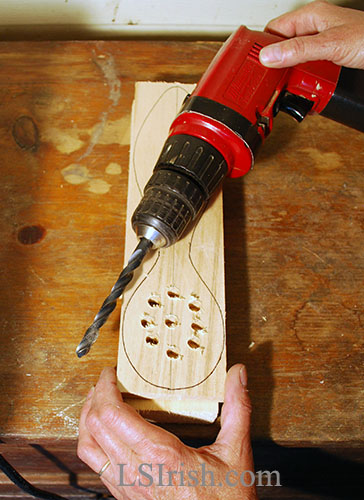
Step 7: Drilling the holes for a slotted spoon
Using a 1/4″ or 3/8″ drill bit drill the holes into your slotted spoon before you do the scroll saw steps. I prefer to drill from the back of the spoon towards the spoon’s front face. Because I will be carving the front face of the spoon into a bowl shape, if I chip-out any of the holes during the drilling process, those chip-outs will be carved away later in the work.
Basswood chips easily because it is a soft wood. To avoid excessive chip-outs use a new, sharp drill bit and an even medium speed with your drill. Clamp your spoon blank to a piece of scrap wood. This clamps and secures the back grain fibers and reduces chipping. You can also use masking tape on the bottom of your spoon to help hold the grain fibers in place.
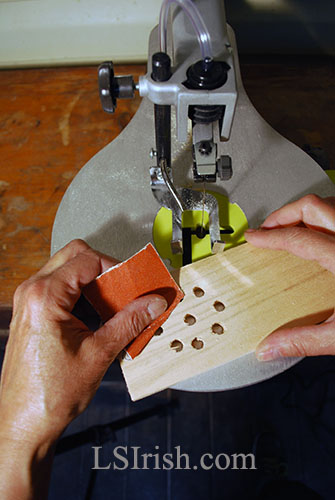
Step 8: Sand the drilled holes before you do the scroll saw cutting
Remove any loose or chipped-out wood from your drilled holes, on both sides of the wood blank, before you move onto the scroll saw with sand paper. Those chip-outs can cause your blank to drag, or hang-up on the scroll saw cutting table.
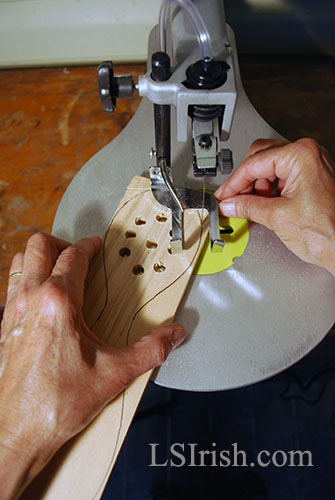
Step 9: Cutting a slotted spoon blank
The slotted spoon is now ready for scroll sawing.
Step 10: Finished wooden spoon blanks
Now that the three wooden spoon blanks have cut out we are ready to move into the wood carving steps of our project. See ya’ there!
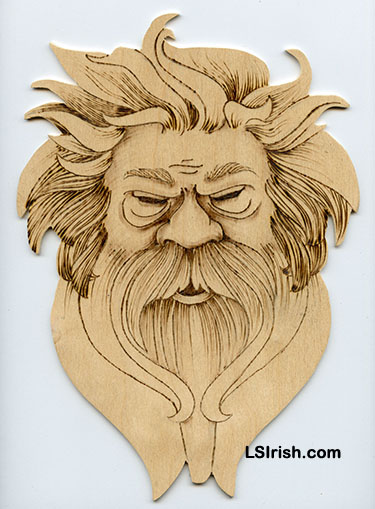
Since this seminar is all about how to incorporate multiple hobbies into one project, during this posting we will be using colored pencils to create skin coloring for our scroll saw cut, wood burned Wood Spirit face.
There are several excellent brands of colored pencils that we can use in pyrography. I strongly suggest that you invest in an artist quality or artist grade set. Student grade or school grade colored pencils, as those that come with the new Adult Coloring Books are often chalk-based and do not apply to wood in a smooth, easy to blend layer. Artist quality pencils are wax-based or watercolor-based, apply easily and evenly across your wood, paper, and even fabric.
The following are a few of my favorites, available at Amazon.com and I do mix and match manufacture brands in any project!
Prismacolors are my favorite for watercolor paper, vellum, and chip board colored pencil work. These have a soft wax core, blend easily, and will leave a nice, rich coloring with light strokes.
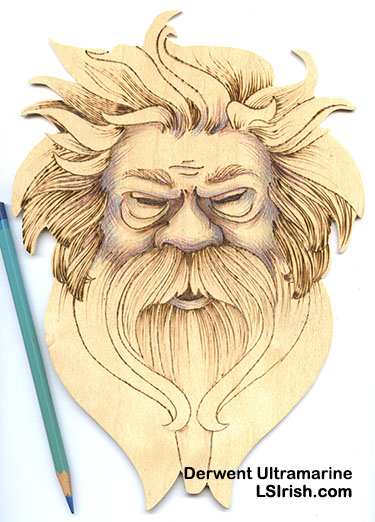
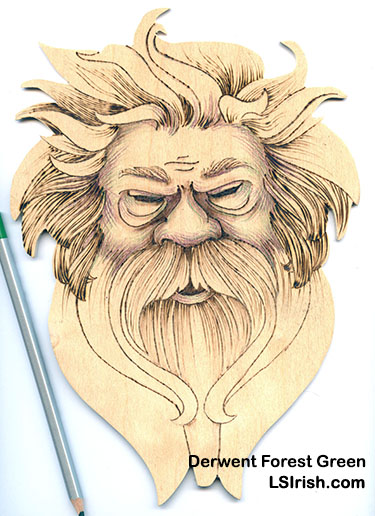
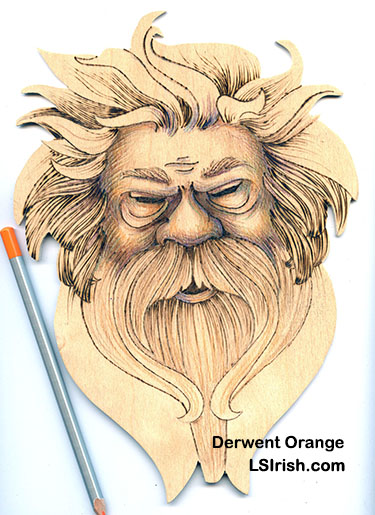
I use my Derwents for adding coloring to wood burnings on wood. Derwents have a harder core than Prismacolor and are perfect for getting into the tight wood grain and deeply scored pyrography detailing that some of our wood burnings have.
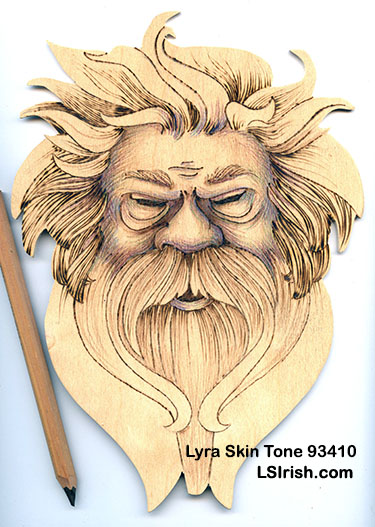
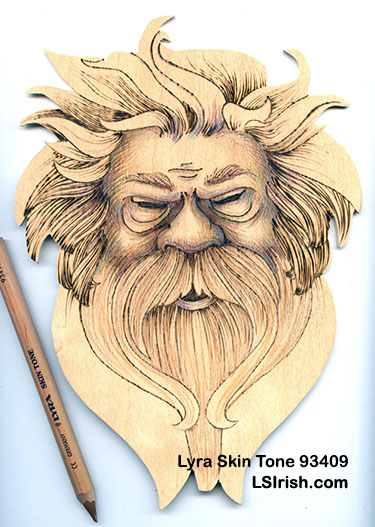
Lyra is a must-have for anyone who does a lot of skin tone work. This pack has twelve extra-large pencils in the most common skin colors. No mix, no mess, just chose the shade for your shadows, highlights, and general skin tones.
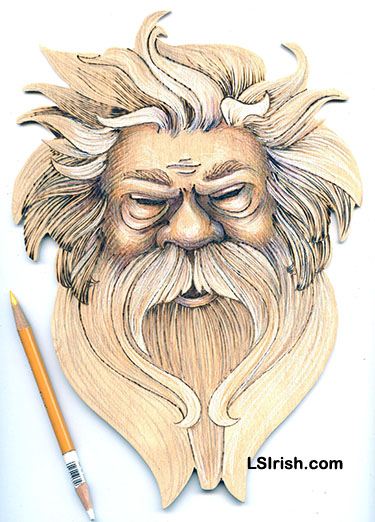
Step 1 Since my wood spirit will become the end caps to a small, outdoor bird feeder I have chosen basic, strong colors for my project’s skin tones. As we work through these steps you will be able see how working one color of pencil over another creates new color hues in your project.
You do not need a large set of pencils. A set between 12 to 24 is enough colors to create a wide range of hues by working one color over another.
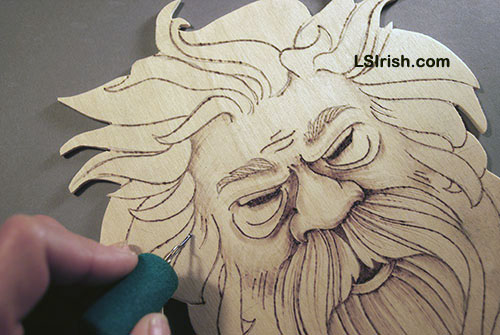
Note: Colored pencils apply best when laid down in light-pressure, thin layers, not heavy-pressure one-step coloring. Thin layers allow the wood burning shading to clearly show through the hues and can be developed with additional layers to create deep, rich color tones.
Keep your pencil points sharp so that the point can easily reach into the fine crevices of the burned strokes and wood grain.
New colors can be created by working thin layers of one color over another color. For best results apply the darker toned color first then lay the paler color tone on top.
Step 2 We may refer to skin colors as white, yellow, red, brown, or black, but all skin colors are simply shades of orange. All humans have orange colored skin! Some of us may have pale white-orange skin, and others a red-orange tone, and some such a deep coloring of orange that it appears almost black … but everyone of us is orange!
To learn how to get that perfect skin color every time. please read Adding Skin Colors to Wood Burnings. It is an in-depth look at the mixing color hues to get just the right shade of orange for your portrait.
The base shadow color for my wood spirit is black cherry – a rich, deep red-purple. Work several light layers of black cherry over the areas of shading in the face that you created with your wood burning steps.
Since all skin tones are shades of orange, we are using a purple-toned colored pencil for a our base shading step. Purple is the compliment to orange and when the orange pencil is worked over this purple shading the finished coloring will be a rich shade of brown.
Let your pencil lines show, let them go in random directions, and keep the pressure on the pencil tip light. The random lines add to the wild look of the wood spirit.
Step 3 Since I want my wood spirit wild and woolly I am adding more shading over my base of black cherry using a deep ultramarien blue colored pencil. Work several light layers of ultramarine blue in the same general areas as the pyrography shading on the face, but do not cover up all of your black cherry work.
Skin is transparent, while it does have pigment you can see through the skin to the vein and bones in the body. Blood veins often have a bluish cast under the skin, so in our wood spirit we can use the ultramarine blue to pick up that effect.
Just as we allowed the wood burning shading of the face to move into the hair strand area, take some of this colored pencil shading into those same areas.
Step 4 A couple of light layers of forest green shading blends the shadow areas of the face. Note in the photo that no area of the shading now has one individual strong coloring, but instead has a speckled, blended effect. Green works just as tones of blue in portrait coloring, implying the under-structure of bone and veins.
Step 5 Now that you have the shadows well established in the face it is time to overlay the general skin tone. I used a medium rust-brown pencil for this general overlay. Apply several light layers of coloring to the face. Allow some areas of the original wood uncolored to create your highlights – the center of the forehead, the outer corners of the upper eye lids, the center of the eye wrinkles below the eyes, the center line of the nose, the center of the cheeks, and the center of the mouth.
As with all of the other colors, work these layers of skin tone directly over your previous colors, and expand your coloring area towards the areas that you will leave as highlights.
Two light coats of this general skin tone is also applied to the mustache and beard area of the face to give it just a touch of color toning.
Step 6 Several light coats of orange is applied to the entire face – over the shaded areas and the highlights. This orange is what gives the skin its warmth, makes it feel alive.
Step 7I decided that I wanted my wood spirit to have a darker base coloring to his skin tone. So I have added a few layers of a darker brown skin colored pencil.
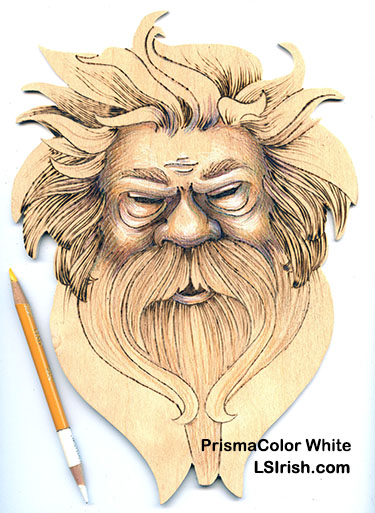
Step 8 My highlights in the face as of Step 7 are in bright orange. To add those bright reflective spots on the high areas of the face I use Titanium white. Again, use freely moving strokes and let your pencil lines show.
In this photo you can note that my pencil is two-toned. When a colored pencil becomes to short to place in the pencil sharpener or too short to hold comfortably, simply super glue the blunt end to the end of another pencil!
Step 9 I want my wood spirit to have grey-white hair, so I will be using the coloring of the birch wood as my base color for all of his hair and beard.
To create individual strands of hair I used the Titanium white pencil, and worked long, curving lines of white from his face towards the outer edge of the hair area.
This white is worked in those hair strands that are closest to you, on top of other strands. Click on the image for a close-up.
Step 10 Using a medium grey or french grey colored pencil I have added more hair lines into the mid-ground and background hair strands. Again, let your pencil lines show.
Step 11 My last step is to intensify the white throughout the wood spirit’s face and hair. As this is the last layer of colored pencil work I can add extra pressure to the pencil to create thicker line work.
Once the coloring is completed I give my wood burned colored pencil projects a light coating or Reworkable Spray Fixative. This is a matte toned finish that protects the work you have already accomplished but that also allows you to add more colored pencil work over your piece.
This protects the work I have done while I decide what final finish I may want for the project. Since this scroll saw wood spirit and its matched gang-cut piece will become the end pieces for my small bird feeder, it will eventually be finished with polyurethane after it is attached to the feeder.
Thanks for reading ….. tomorrow we will be working on scroll saw cutting our wooden spoon and the wood carving steps for that project. See ya’ there!
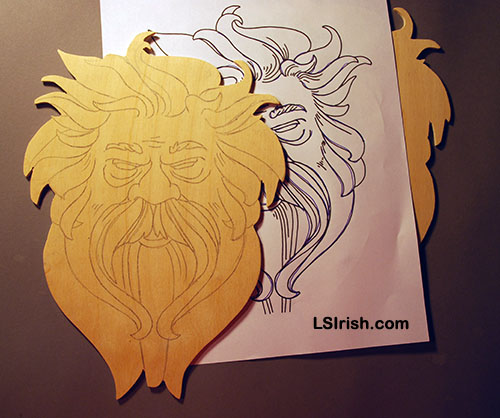
During this Cross-Crafting Seminar we have looked, in-depth, at how you can use a scroll saw to add new dimensions your wood carving and wood burning projects. In today’s post we will be wood burning the Wood Spirit face that we scroll saw cut in the last session.
If you are new to pyrography, please visit our links page Pyrography, found in the header nav bar. This will give you lots of links to the tutorials, teaching sessions, and techniques posted here at LSIrish.com about wood burning.
As we work through these next two session to this seminar you will see that I am using pyrography to set my shadows and hair lines in the wood spirit face. We will then use colored pencils to add the coloration.
Note: If you are new to pyrography, in our right hand nav bar you will see a free PDF on which pen tips to use, and what burn strokes each create. Please download it now.
Wood burning tool – for this project I used my Optima Spear-point, or flat shader pen tip Ball- or looped-tip pen Heavy-gauge wire triangle hair tip #6 to #8 soft graphite pencil green painter’s tape white artist eraser large scrap of brown paper bag leather strop and honing compound
My recommended wood burning tool favorites include the Walnut Hallow Versa-Tool for first time pyrographers. If you are ready to up-grade to a high-end, variable-temperature tool then I suggest either the Colwood or the Optima.
Below each pyrography tool listed is a link to an in-depth seminar that will not only give you a free, step-by-step project you can start today, but also allow you to see each of the three pyrography tools in use to help you decide which unit is the best for you.
These three in-depth tutorials are hosted on a wood carving forum. Unfortunately I am banned/blocked from posting to this forum now because of technical difficulties on this forum. So, if you have questions or comments about these three projects please email me here, through my blog. Do not post to these threads as I can not read, see, or answer your questions there!
Walnut Hollow Versa-Tool Toucan Project – Looking for that first wood burning tool, then take a few moments and read through this tutorial for an in-depth review of the Walnut Hollow Versa-Tool used to wood burn a Toucan Family.
Colwood Winter Birdhouse Wood Burning Tutorial – This in-depth, step-by-step project focuses on a winter bird house wood burning scene. The project takes you from the initial tracing of the design to the final coloring steps.
Irish Optima Pyrography Seminar – This in-depth pyrography project shows over 250 detailed, close-up photos, step-by-step instructions, and in-depth explanations of texturing, shadings, and fine line work used to create the Advertising Barn landscape.
Note: Click on any image for a full-sized photograph. Now, my apologizes! I know that some of these photos are dark. I accidentally got such a sharp polish on my wood during the crumpled paper stage in Step 1 that the wood had too high a reflective quality for the photography lights … AH!
Before your trace your pattern, take a few moments to lightly sand your wood using a crumpled brown paper bag. Paper is an extremely fine-grit sanding media and will remove any remaining fine wood fiber, polishing the wood surface.
There are several ways to trace your wood burning pattern to your burn surface, and those are explored in the link above. For this project I chose to rub the back of my pattern with a soft, #6 to #8 graphite pencil. Tape the pattern to the scroll saw cut wood with the pattern showing and the graphite surface against the wood. Use an ink pen to trace over all of the lines.
The graphite from the pencil rubbing will leave a medium-toned grey line on your wood. It can easily be burned over as you work your pyrography and then removed using a white artists eraser when the pyrography is completed. Carbon paper, graphite paper, and newspaper tracing can leave permanent – non-removable – lines on your work … a pencil rubbing is the cleanest media for tracing.
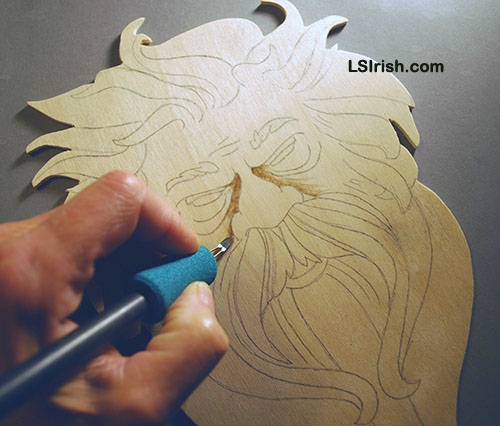
Using a flat, or spear-shaped shader, set your wood burning unit to a medium temperature. For my Optima that is a setting between 4 and 5. Lay the shader with the flat bottom of the shader on the wood, along the cheek at the side of the nose. Using a smooth, even pull shade along the nose edge.
The inner corner of the eyes at the nose bridge is the deepest shadow point in the face. The second deepest is the bottom corner of the cheek at the edge of the nostrils.
Note: Every wood burner unit manufacture has their own name for their own pen tips. As example a looped tip can also be called a standard writing tip by a second manufacture or if it is from a third manufacture it can go by just an SKU number. So the names for each tip can change according to what unit you are using. Please check the photos for what shaped pen tip I am using and then use the closest tip you have for your unit.
Step 3 The dark shading continues, using the flat or spear-shaped shader along the bottom edge of the nose. An extra dark c-shaded stroke is used to create the black of the nostrils.
At the bottom of the cheeks, next to the nose is a wrinkle area that is triangular. This area is deeply shaded towards the black-brown tonal value.
The eye lids and eye wrinkles are shaded along the bottom edge of the pattern line, with the darkest shading near the nose and allowing the stroke to pale as you pull it towards the outer edge of the face.
With a light touch, shade the sides of nose. Allow a very thin line of white – un-burned – area at the outer nose pattern line.
Step 4 Turn your wood burning unit down to a cool-medium tone. For my Optima that is a setting just below 4. Using the flat or spear-shaped shader shade along the outer cheeks, sides of the face and the forehead area of your wood spirit. Allow some of this shading to move into the hair areas of the face.
Darken the inside of the mouth and the small space below the nose that separates the sides of the mustache with a medium- or hot- temperature and the flat shader.
Step 5 Begin shading the top or inner areas and sides of the hair strands using the flat or spear-shaped shader and a medium temperature setting. The heaviest shaded hair sections are top of the mustache and the beard that is trapped inside of the sides of the mustache. Use long, flowing lines to imply individual hair strands.
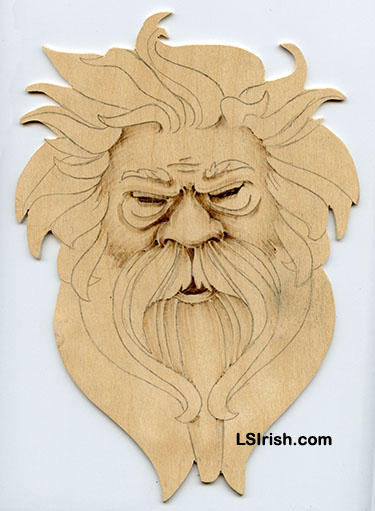
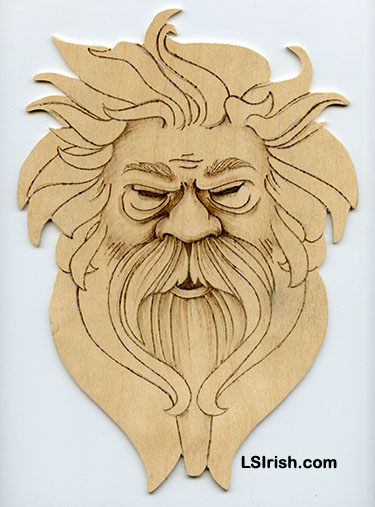
Scan to this stage of the work: Click for a larger image.
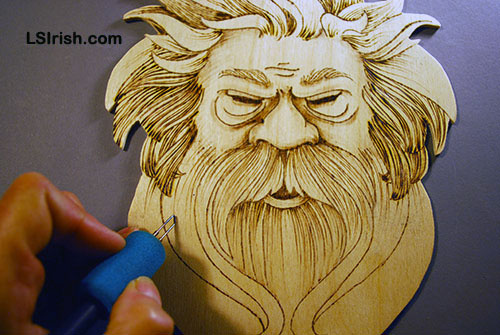
Step 6 I have changed to my ball-tip writing pen and set my temperature to a high setting. For my Optima that is between 6 and 7. With the ball-tip, outline all of your pattern lines for both the face and the hair strands.
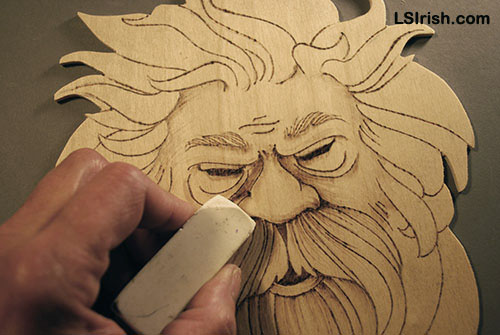
Step 7 Take a moment and with a white artist’s eraser remove any remaining tracing lines that are visible. Use a dry, clean cloth to remove the eraser particles.
Colored erasers, like the bubble gum pink school erasers, can leave streaks of dye color on your wood surface that can only be removed by sanding that area back to the un-burned, raw wood. White erasers have no dye and will not mar your burning.
Scan to this stage of the work: Click for a larger image.
Step 8 On the high temperature setting, using a heavy-gauged wire hair tip begin adding the individual strands of hair. Each strands is worked from its closest point near the face out towards the outer edges of the hair strand.
Since we will be adding colored pencils to this project not every strand of hair needs detailing. For my wood spirit I chose those hair strands that were in the background of the design for his head hair, and at the top of the mustache and beard.
But hair is just plain fun to work, so add as much detailing as you like!
If you do not have a heavy-gauge wire hair tip you can use the side or edge of your shading tip to burn wonderful hair lines.
Step 9 The finished wood spirit can be left in just its pyrography stage or you can follow me in the next posting where we will use colored pencils to add his skin tones.
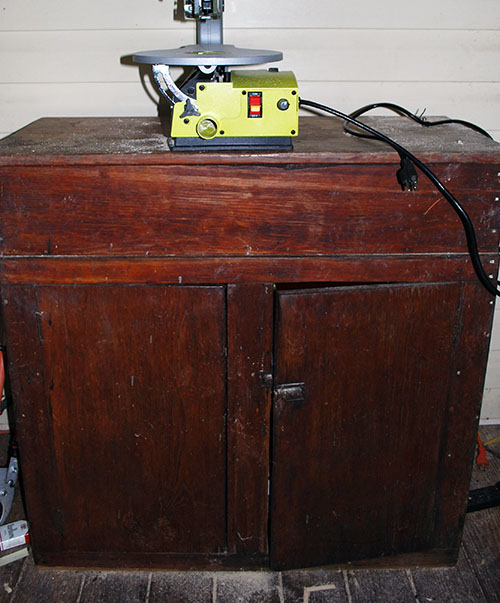
Where and how you set up your scroll saw is extremely important to the quality of cutting your can do in your new craft. We will take a qick look at several options to placing your saw into the most comfortable, accurate cutting position as possible.
I am lucky enough to have both a full-dedicated woodworking shop and a craft studio. My shop holds my table saw, drill press, band saw, as well as an extra-large work table where I can clamp, glue, and sand. The craft shop is where I work on my smaller projects as my wood carving and wood burning.
But, for right now, I am setting up my scroll saw on my back porch! Since the Ryobi 16″ Variable Speed Scroll Saw is quite portable I can store the tool in its shipping box in the studio when I am not using it, and then move it to the porch for those quick cuts or full-length projects.
The reason I am working off the back porch is because I have an old, hard-used dry sink that measures 38″ from the floor to the table top – a perfect height for me for scroll saw cutting. The base of the dry sink holds two shelves where I store several furniture clamps, my vise, and some of the woodworking tools that I need around the studio.
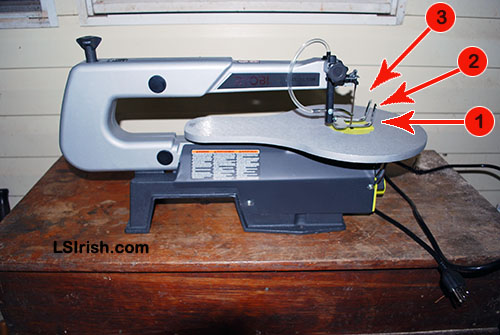
For me, a standing position is the most comfortable for accurate cutting. The height of this dry sink lets me look into the saw blade area of the scroll saw at a 45 degree angle – perfect to see exactly where the blade is in the wood and to clearly see the cutting line on the pattern. Note position #2 in the photo.
A standard table is only 30″ tall at the top of the table. If you are in a standing position this puts your focus point directly on the wood. While you can see the pattern line clearly, this high angle obscures your view of the saw blades working edge. Note position #3 in the photo.
If you chose a sitting position using a kitchen chair, at a standard table your visual view is at a very low angle to the saw. You now see the full length of the saw blade but can barely see your wood or pattern line. Note position #1 in the photo.
There are several easy, inexpensive options for your new scroll saw table.
You can purchase scroll saw stands that are heavy-weight metal made specifically to hold smaller-sized power tools. These are great if you have a full-dedicated workshop. The stands often are made to have a plywood table top which bolts to the stand. You can then bolt your scroll saw to the table top to reduce vibration.
Check you have a local Habitat for Humanity ReStores your tall kitchen cabinets or bathroom cabinets at extremely reasonable prices. Again, you will need to create a table top, out of 5/8″ plywood which you bolt to the cabinet. If your kitchen cabinets are a bit short you can create a plywood box for the table top that brings your saw up to the perfect height for you.
If you are using a regular table, studio table or kitchen table, which are only 30″ high, you may want to purchase a tall bar stool for just a few dollars at your local GoodWill. Since you can’t safely raise the height of your saw you can easily raise yourself to get that 45 degree view of the saw.
A few more considerations.
I find that I do need a wide foot print around my scroll saw as I work. I tend to move my body, re-position my stance left or right, as I move through the curves. So I work in an area where I have about 2′ to 3′ feet of clear space on either side of the scroll saw table.
Because of the amount of dust created by the saw I find that a good, heavily-textured floor mat gives me a firm stance on the floor. Saw dust can be quite slippery! A 4′ x 5′ bound-edged rug works well, but you can also purchase heavy rubber floor mats meant for shop use.
Be sure that your working table is firmly set on the floor. Shim the table legs or base if necessary to insecure you have a secure working space.
If your scroll saw is light-weight, does not have a heavy iron base, you will want to secure the saw directly to the table top. You can either bolt the scroll to the table as most scroll saws have holes pre-drilled in the base to permanently set the saw to its stand or table. You can also use furniture clamps to secure the saw base to the table.
Never set your scroll saw on an unclamped or unsecure surface to raise the level of the blade to a better visual view … don’t set it on a stack of scrap plywood, stack of books, or a cardboard box. Any of these ‘solutions’ can slide out from under the saw or simply colapse while the saw is running. Instead, if you need to raise the level of the saw, do so by raising the entire table or cabinet using a 2″ x 4″ frame bolted directly to the bottom of the table.
To reduce any excess vibration try setting your scroll saw on a non-skip kitchen matt before you clamp it to the table. These matts are very inexpensive security!