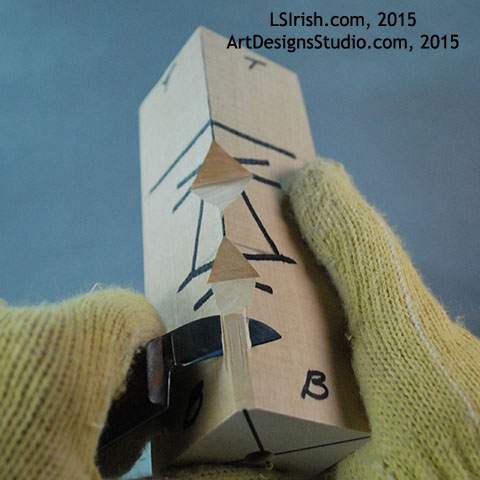
Today we will work through establishing the depth of the nose bridge, the slope of the nose, the division between the nose and the mustache, and freeing the nose from the cheeks.
So, click on the link below and let’s get carving!
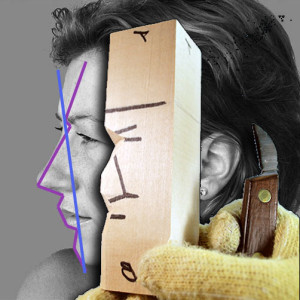
If you are just joining this free, online wood carving project, by Lora Irish, please check out the links below for your supply list and an over view of the planes of the human face.
To learn more about Wood Spirit Facial Plane carvings, check out our E-Project – Wood Spirit Mushroom Carving E-Project – which takes you through all of the steps to create the facial planes, plus gives you eight full sized 3D patterns. If you want to focus on the Wood Spirit face, check out Wood Spirit Carving E-Project, which takes you through the face carving as well as how to paint your wood spirit walking stick.
Use our discount code – facebook – for ArtDesignsStudio.com for $5 off that can be used for each Cane, Walking Stick, and Wizard Wands Pattern Packs or E-Projects above. Save up to $20 on your next wood spirit carving project!
As a new wood carver you would think that the classic wood spirit face would be difficult to create. Yet, it is one of the simplest, method-technique topics that wood carvers and whittlers can work.
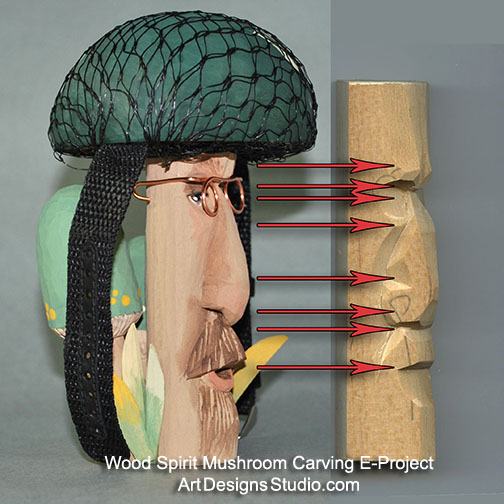
Face carvings, as the wood spirit, or as shown above as a Mushroom Wood Spirit, begins with a series of simple angled cuts to establish the planes in the face. These planes create the depth, width, and feature areas as the rise of the eyebrow ridge, the deep set of the nose bridge, and the angle and slant of the mouth.
Where you create the planes and angles determines the finished look of the face. In this sample the nose plane is exaggerated and the eye depth plane is minimized. When the shaping steps are done, this Mushroom spirit has an extra long nose that fills up the needed space to create the mushroom stem.
To learn more about Wood Spirit Facial Plane carvings, check out our E-Project – Wood Spirit Mushroom Carving E-Project – which takes you through all of the steps to create the facial planes, plus gives you eight full sized 3D patterns. If you want to focus on the Wood Spirit face, check out Wood Spirit Carving E-Project, which takes you through the face carving as well as how to paint your wood spirit walking stick.
And, if you stop by our new Facebook page you will discover a discount code for ArtDesignsStudio.com for $5 off that can be used for each of the Pattern Packs or E-Projects above. Save up to $20 on your next wood spirit carving project!
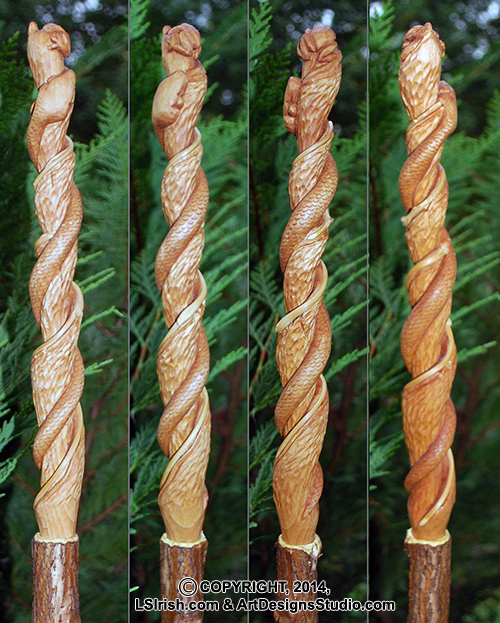
Good Morning! I am running far better on time this morning than I expected so I am going to post the final steps to this Sassafras Twistie Snake Cane today.
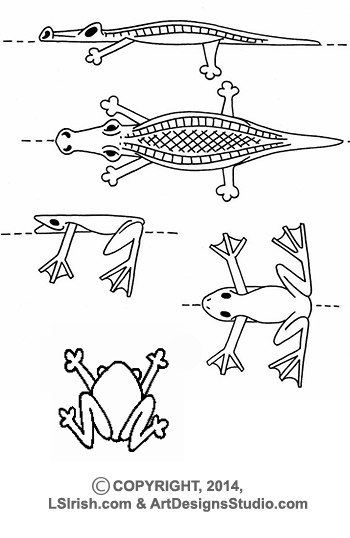
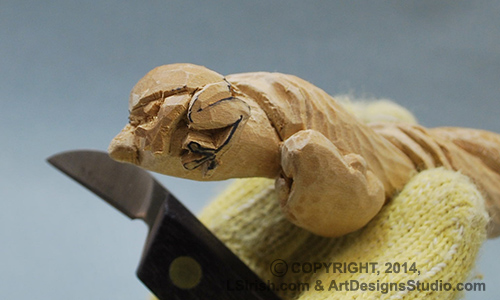
Step 19: To finish out the top of my cane and add some fun interest I have added a small frog clutching to the stick, just out of reach of my snake’s head. The tracing pattern is posted here or create your own cane hugger by marking it to the top of your cane topper with a pencil.
Cane huggers – small animals and birds that wrap around the sides of your cane – are an old carving tradition. These little creatures most often have out-stretched arms or wings that ‘hug’ the shaft of the stick. Beavers, raccoons, squirrels, mice, dragonflies, and, our choice, frogs are all found in folk art styled walking sticks.
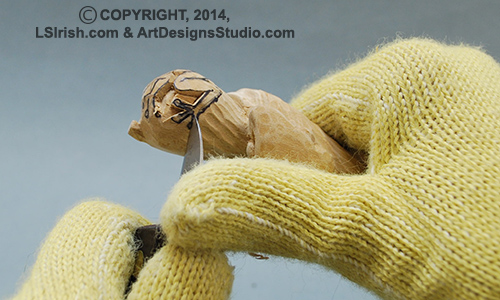
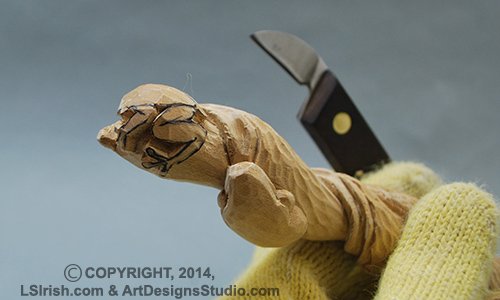
Step 20: The frog is first stop cut using the bench knife, along the outer edges of the frog’s body. This separates him from the top area of the stick. I lowered the cane top about 1/8″ at the frog’s face and tapered it down to 1/4″ at the frog’s rump.
Taper the stick twist area of the top to gradually flare.
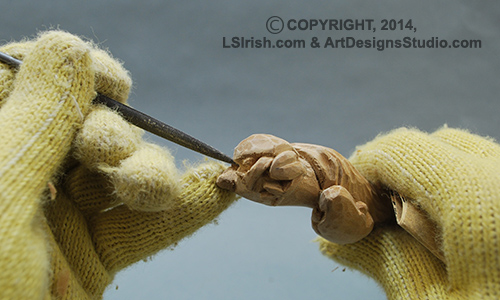
Step 21: Undercut the stick area into the top twist. This deepens the wood around the frog, making the frog appear to stand higher off the cane.
Shape the frog body, legs, and eyes using your bench knife to round-over each area. With 220-grit sandpaper and rifflers, smooth out the frog.
Step 22: You can harvest fresh honeysuckle vine to use on your Sassafras twist cane. Select second year growth or older – it will have a brownish tone to the paper-like bark. Green tone bark is first year growth and often is not strong enough to dry well.
Roll the vine into a loose circle and hang in a dry, dark space for about 3 weeks. This is long enough for the vine to loose most of its sap and moisture, but still be pliable enough for curling.
Strip the paper bark layer from the vine before you add it to your walking stick Sassafras carving. Honeysuckle looses its bark easily. If you leave the bark on the vine only the bark layer will be attached during the gluing. When the bark is shed you will lose the vine around your cane.
You can also purchase pre-dried, pre-striped honeysuckle vine, seagrass, raffia, and even paper rope from most baste weaving supply stores to use with your canes.
Soak your vine in warm (not hot) water for about 10 minutes. Lightly blot on a dry towel to remove the excess water from the outer surface.
Check the thickness of your vine – the thinner part of the vine should be at the top of your stick, with the thicker, older growth, at the bottom. Using super glue, place several drops into the vine trough on your carving then place the vine into the trough. Hold in place for about 1/2 minute. Work just one or two inches at a time, slowly rolling the vine around the cane.
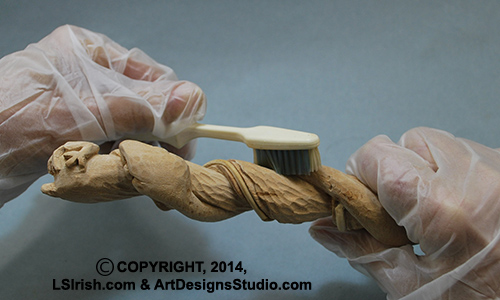
Step 23: Cleaning and finishing prep steps.
With any cane topper my cleaning steps begin with a hard scrubbing using an old toothbrush which can reach into the deep undercuts. This is followed by a quick wash at the sink to remove any dirt and hand oils, using a small amount of dish washing soap, warm water, and a small glass scrubbie brush. Rinse well, but do not over-saturate or soak in the water. Blot your carving and allow to dry for about an hour.
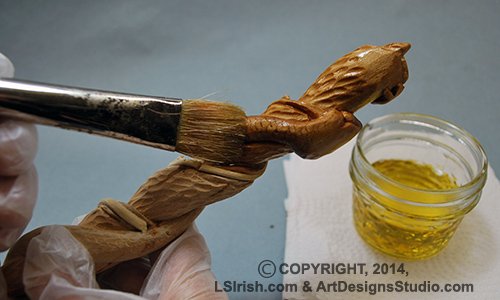
Next, mix one part linseed oil with one part turpentine. Stir well, but don’t make bubbles. Brush one generous coat to all areas of the cane except the very bottom edge. Allow the oil mix to sit for 10 minutes. Wipe briskly with a dry cloth to remove the excess oil. Repeat one time.
This oil mix replaces the natural oils of your caving wood and soaks deeply into the wood fibers. After the oil finish has set for several days you can return and apply whatever finish you personally prefer, including polyurethane, varnish, or wax. If, as I prefer, I will add several more coats of oil mix over about a one week period as my final finish.
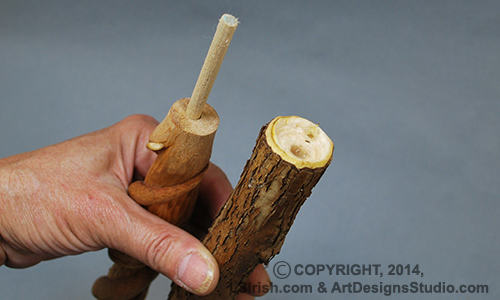
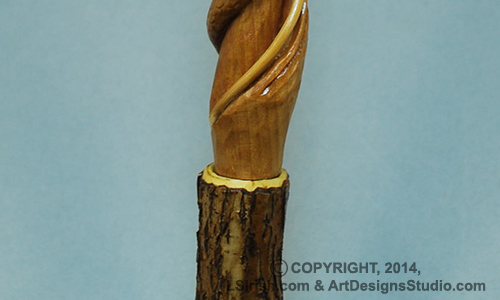
Step 24: My cane stick – a two to three year Black Walnut branch – is still green. So I will be dry setting this stick, and will not do the final glue-up until several months from now.
I have drilled a 3/8″ hole into both the cane topper and the Black Walnut stick. For my dry set I am using a 3/8″ hardwood dowel, which will be replaced with 3/8″ threaded pipe when I do the final gluing. My dowel holes go as deeply as possible into both parts of the cane to give as long a section as possible for the jointing pipe.
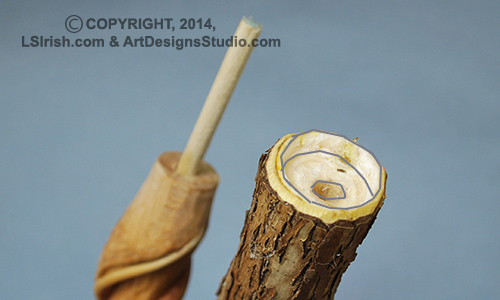
To hide the joint line between the cane topper and the stick, I have used my bench knife, and small round gouge to cut a 1/4″ deep well inside of the top of the Black Walnut stick. The outer 3/16″ of the stick is left un-carved to create a lip area.
When the cane topper is put into place on its stick the joint line between the two parts is hidden by the well area in the top of the stick.
In a couple of months, after the Black Walnut is well dried, I will set the cane using two-part epoxy and the 3/8″ threaded pipe.
Step 25: Thank you for letting me share my love of carving with you in this cane carving project!
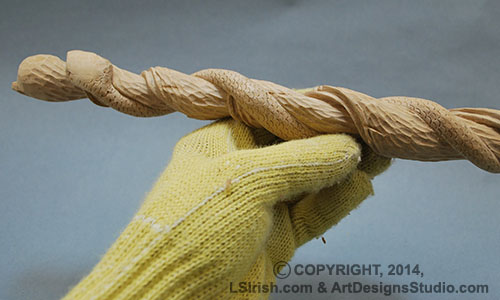
Today we will deepen the honeysuckle twine area, shape and detail the snake’s head, add texture to the Sassafras bark, and do a general clean-up of the cane work. So, let’s begin having more fun!
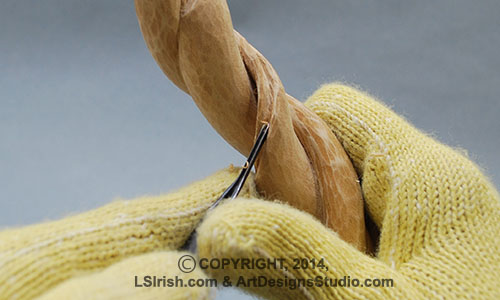
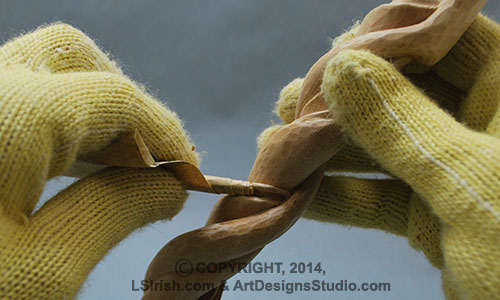
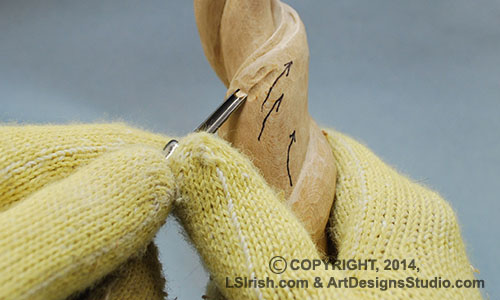
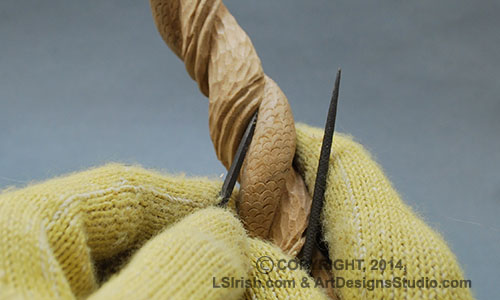
Step 13: Very small, tight-arced round gouges are called veining tools. This tiny round gouge makes straight-walled, round bottomed troughs, which are perfect for deepening our honeysuckle stem area.
Similar to the veining tool is the checkering tool used in gun stock carving. The checking tool comes with either a small round gouge or v-gouge, plus it has an adjustable l-shaped arm. You make your first cut line in your checkering pattern. Then adjust the l-shaped arm to the distance you want between the rows. Drop the arm into the first cut row, and it controls the distance between the rows as you cut the next.
I note the checkering tool here because while you may not ever try gun stock carving, those checkering tools make wonderful backgrounds for your relief work.
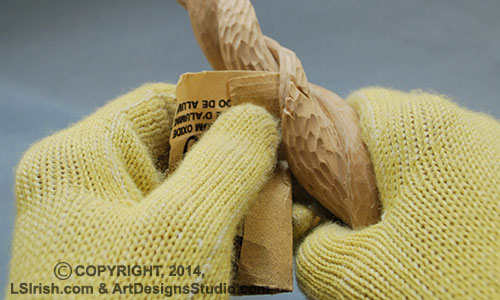
Tear a small square of 220-grit sandpaper from the large sheet and roll it tightly into a tube. Use the tube to sand the honeysuckle trough area along the top of each Sassafras twist.
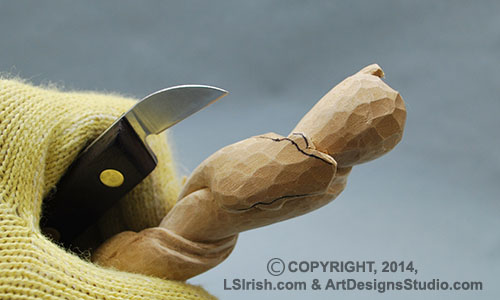
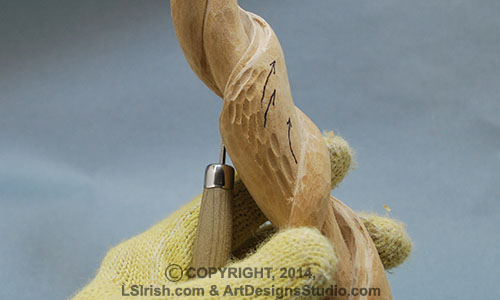
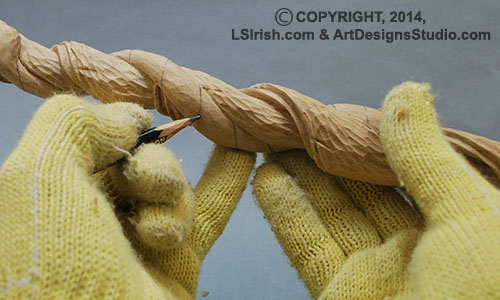
Step 14: It’s time to shape the snake’s head. To begin this area, I re-marked the outline and eye placement of the snake with permanent marking pen. Since we will carve this area, any pen markers will quickly be worked away.
Cut along the outer edges to reduce any excess wood from the head.
Cut along the edge of the eye area with a stop cut to lower the eye slightly on the head.
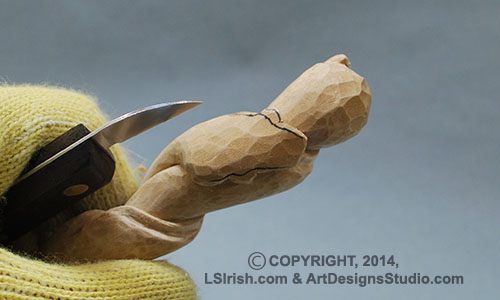
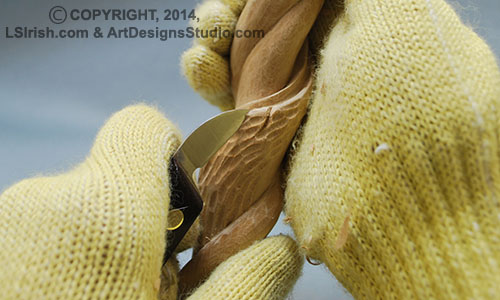
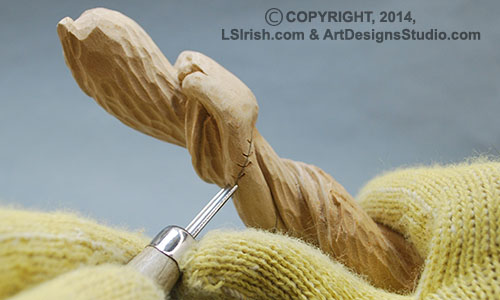
Step 15: Round over the eye area, using the bench knife.
Make a small, slice in the head at the outer corners of the eye, to emphasize the eye, and to create the impress of the jaw and cheek.
A Quick Reminder – I am posting this Twistie Stick Snake Cane each day on my favorite carving forums. Stop by, join up, so that you can post your questions and photos!!!! Carving forums are like potato chips … just one is never enough … Grin!
And while you wait to get started, visit Roy’s relief Carving Class thread – See our widgets in the right hand nav bar and on both forums!!!!
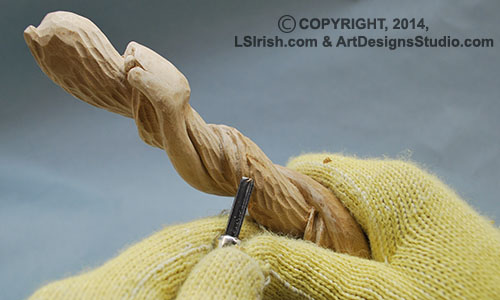
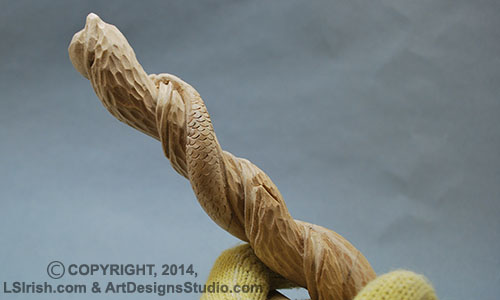
Step 16: Texturing the Sassafras bark is done with both the veining tool and your small round gouge. Cut small, shallow tear-shaped gouge strokes in the bark area using the small round gouge first.
Note in the photo that I am making the bark twist by angling my strokes with the curve of that twist area. Do a few veining tools cuts to add smaller texture strokes.
With the bench knife, make a few stop cuts along the top edge of the bark in the twist areas. These stop cuts make the bark appear cracked or split – a natural occurrence for any Sassafras stick.
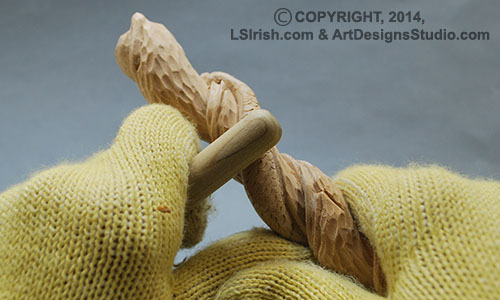
Step 17: Bark, literally, lies on top of the wood of a stick. To emphasize that the bark and the wood are two different areas or elements, use your v-gouge to cut a small, thin trough where these two areas meet. You can also use your bench knife to make a few, shallow undercuts into the bark to make it appears as if the bark is slightly peeling.
A little more sanding … These cleaning steps are technically called ‘dressing out’ the wood and used to catch those little imperfections while you have them in your sights.
Step 18: There are many, many ways to work the scaling of the body of a snake, lizard, or dragon. What I am using here is the most simple and fool-proof that I know. In working my snake, I lost just two scales – two that ‘popped’ out during the cut and my solution to those two was to simply ignore them. Mistakes happen and sometimes trying to fix a mistake just makes them worse.
Begin by marking parallel lines along the snake body lightly with pencil. Also take a moment a re-fresh the edge of your small round gouge on your honing board or leather strop.
Up-end your round gouge, which means to hold the gouge at a 90 degree angle to the wood so that the cutting edge is go straight into the wood. Gently push the gouge into the wood to cut a half-circle profile cut. Lift the gouge straight out of the wood. This is a simple push and lift stroke.
I worked several up-ended small round gouge profile cuts along the guidelines to set the spacing of the rows. Then I worked off of that center cut to create the other profile cuts in the row.
Some of the profile cuts made with my small round gouge were slightly lifted from the snake’s body. To ‘heal’ them I rubbed the wooden handle of my gouge over the snake, moving from the head towards the tail. This light pressure sets the scales back against the wood.
Healing can be done at anytime in a carving. Example, if you make a stop cut that is slightly too deep, after the second stroke is complete, turn your bench knife upside down and place the blunt side against the deep cut. Use a medium pressure and pull the blunt side down the cut to ‘heal’ it back together. Work carefully! Remember, in this example, that cutting edge is now facing towards your hand!
This style of scale creation will leave a very light, gentle impression of scales along the body. They become more outstanding when you add the linseed oil finish later.
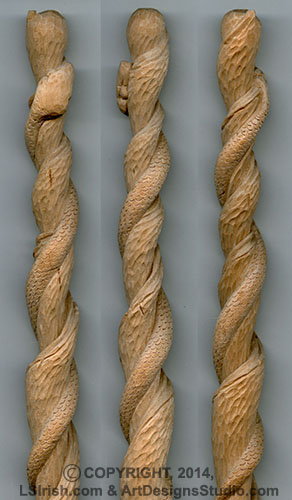
Step 19: At this point the work on the snake is complete, and the Sassafras carving is complete, except for adding the honeysuckle vine into the trough. This is a great stopping point for the weekend.
So, using your roll of sandpaper, rifflers (small, profiled files), and your bench knife take a little more time to dress out your cane. Next Monday we will begin work on carving the frog that holds onto the top of the stick, creating the joints for the cane and stick, and on the finishing oil steps.
But right now … you are ready to go make a bunch of twistie stick key chains for your family and friends as Holiday presents!!!! And, if you have questions, comments, or want to share your twistie stick carving, now’s the time.