Color Placement Guides
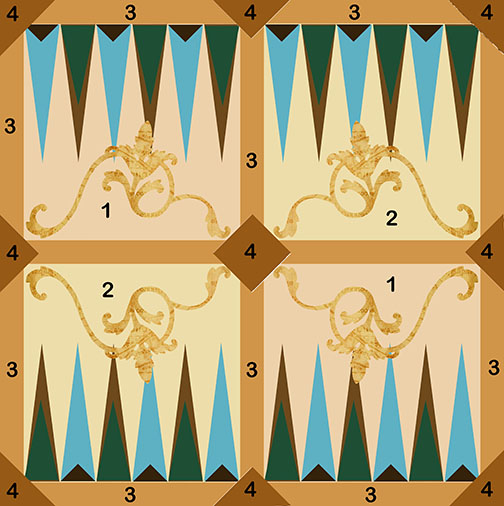
Cutting Guidelines
Using a cutting mat, quilter’s transparent ruler, and a rotary cutter cut your scrapbook papers into the following sizes and shapes.
Paper 1 – background to game board
Cut 2 pieces 8” x 8” squares.
Paper 2 – background to game board
Cut 2 pieces 8” x 8” squares.
Paper 3 – border trims
From one 12” x 12” sheet cut 12 pieces 3/4” x 12”. Set the second 12” x 12” sheet aside to use for the accent designs.
Paper 4 – corner diamond motifs
Cut 5 – 1 3/4” square motif. Cut 4 of the paper 4 motifs along the diagonal to create 8 right angle triangles. See DIAGRAM 3.
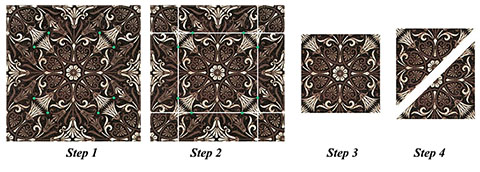
DIAGRAM 3 SQUARE MOTIF
Separate your 12” x 12” motif paper into rows wider than your chosen motif by using a cutting mat, rotary cutter, and transparent quilter’s ruler.
Explore the pattern repeat of your motif strip to determine the outer points of your chosen design.
Make a small pencil mark at these four corner points.
Using your rotary cutter and rule, cut 5 motif squares. Set one square aside.
Cut 4 motif squares along the diagonal line to create 8 right angle triangles.
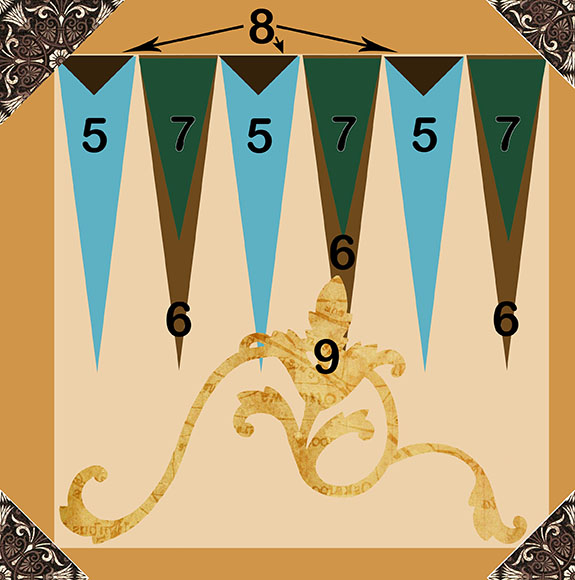
Paper 5 – teal long points
Cut 12 rectangles – 1 1/8” x 4 1/2” *At the top of each strip make a pencil mark 9/16” from the edge to note the center point.
Cut from the lower corner to the center pencil mark on both sides to create the long triangle point. See DIAGRAM 4

DIAGRAM 4 LONG POINTS CUTS
To create perfect long triangles cut your paper first into a rectangle the width and height of your point.
Measure and mark the center point of the top, narrow edge of the rectangle.
Place your rule on one lower corner and on the top center mark, cut. Repeat this step of the second side of the triangle.
Paper 6 – dark brown long points
Cut 12 rectangles – 1 1/8” x 4 1/2” *At the top of each strip make a pencil mark 9/16” from the edge to note the center point.
Cut from the lower corner to the center pencil mark on both sides to create the long triangle point, see DIAGRAM 4
Paper 7 – dark green medium points
Cut 12 rectangles – 1 1/8” x 2 1/4” *At the top of each strip make a pencil mark 9/16” from the edge to note the center point.
Cut from the lower corner to the center pencil mark on both sides to create the long triangle point., see DIAGRAM 3
Paper 8 – dark brown short points
Cut 6 – 3/4” squares.
Cut each square along the diagonal to create 12 right angle triangles, See DIAGRAM 5

DIAGRAM 5 RIGHT ANGLE TRIANGLES
To create perfect right angle triangles begin by cutting your paper into a long strip the width of one side of the triangle – 3/4” x 12”.
Cut the strip into 3/4” squares.
Cut each square along the diagonal line of the square.