
 Six elements determine your wood burning stroke
* Pen tip profile
* Texture fill pattern
* Temperature setting
* Speed of your hand motion
* The number of layers of fill pattern
* Media that your are burning
Pen tip profiles and texture fill patterns
Very little, if any, pressure on your pen tip is used in burning. You do not need to push or force the burner into the wood. To control each stroke you use six basic elements. The pen tip profile determines the shape and width of each stroke, and is discussed in the previous page. The texture fill pattern, also discussed in page one of this wood burning tutorial, determines the style or finished look of the area.
Temperature setting
The temperature setting that you chose for each stroke is a very, important element. Low temperature settings create pale tonal value burns. As your raise the temperature your strokes take on a darker tonal value. Each wood burns at a different rate and you will need to adjust your heat settings to accommodate your specific project. Poplar burns quickly. If you have a setting range of 1 through 10, poplar will show pale values as low as 2 and black toned burns as you near 4. Birch burns from a pale value around a 3 and does not reach the black tones until 7 to 8.
Speed of your hand motion
Light quick movement creates light fine lines or shadows. Slow movement with the burner makes nice dark deep lines or shadows. The longer the tool rests upon an area the darker it will scorch the wood and the deeper it will burn down into the board.
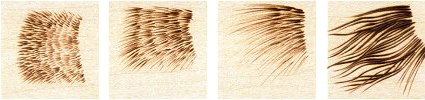
This first series of strokes – fur detailing for wildlife – is done with the blade of the curved shader tip. The blade creates a crisp fine line. For fine fur let just the first quarter of the blade contact the pattern area, pull quickly to make the line soft golden brown. On the second sample, the tool is moved with a slower motion across the wood and just a bit more of the blade is used. By the last sample, half of the blade is laid into the wood and the movement is very slow.
Except for the first sample you can see that each of these lines are curved. This is done by rolling the tool at the shaft between the thumb and forefinger. Curved lines add more interest that straight lines. Also note that the strokes are all burnt in the same general direction within each sample. In sample two, medium hair length, this gives a rolling or rounded effect to the area.


The number of layers you burn
You can use your temperature gauge to determine your tonal value in one area or you can lay new layers of burning strokes over previously worked fill patterns to add deep tones. Layering your fill patterns allows you to slowly increase the tonal value darkness of any area. Laying layer over layer of burned fill pattern strokes lets you first find and establish the shading and shadows to an area, then develop the darkness of that area in relationship to the areas surrounding it.
The photo below shows one small area of a large barn scene that was worked in layers of burned strokes. With the first layer, left side of photo, I created the individual barn boards using a pale mid-tone temperature setting and the spear shader used on its edge. The second layer allowed me to create the texture, wood grain, and knot holes in the barn boards. The dark shadows for the over-hanging roof and the top layer of barn boards was added with the third layer of burning. During this third layer the fine line between the boards, the shadow inside of the barn door, and the barn door supports was worked.


 The media you burn determines your tonal values and line work

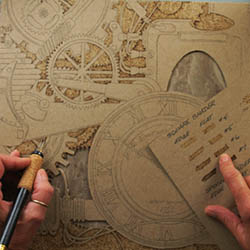
At the top of this page, right, the steam punk clock pattern was worked on a 12″ x 12″ sheet of natural colored chipboard, which is available through scrapbook suppliers. The pyrography on the right, Civil War – Lee and Longstreet, was worked on a 12″ x 12″ piece of vegetable tanned leather. Each has its own specific tonal values, color range, and crispness to the burned texture lines.
What type of natural surface you chose for your next pyrography project determines the temperature ranges you can use, the tonal values you can burn, and how much detailing you can work.
Pingback: Basic Wood Burning and Pyrography Strokes by L S Irish | LSIrish.com – Woodworking
Pingback: How to Creatively Decorate Wood Using the Art of Pyrography – Modern Times News