Simplifying a Pattern into Basic Areas
Relief Wood Carving
By L.S. Irish
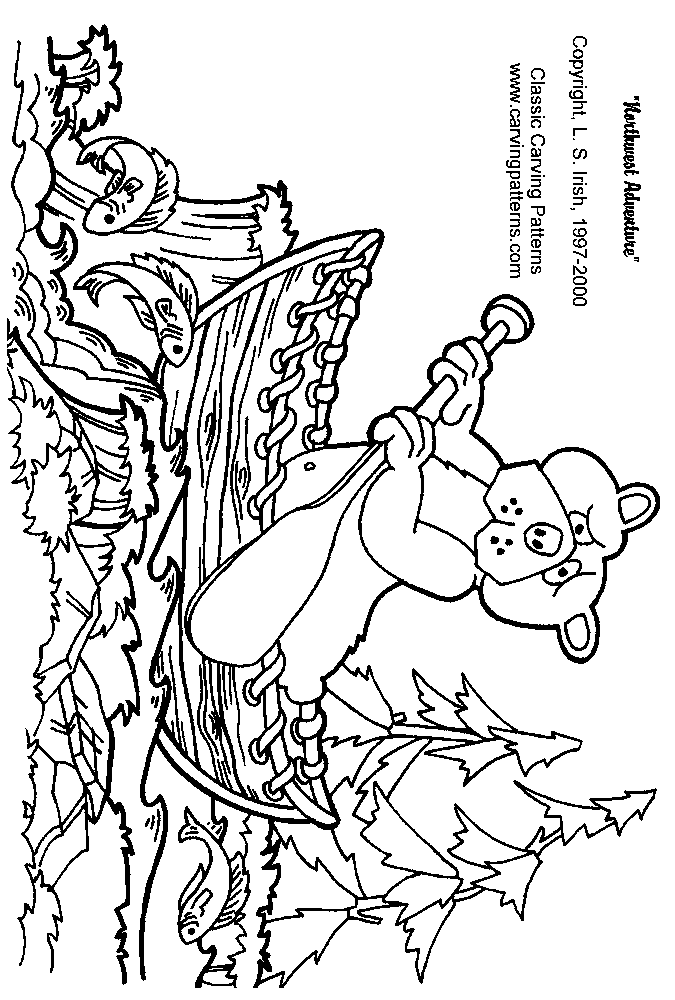
Northwest Adventure Pattern
Working with Levels in Wood Carving
In the Macaw Carving Project, we worked with the idea of grouping items through contour shading. In that pattern all the elements were related to each other, all the items in one grouping were feathers or all the items were leaves on a branch. The Macaw design is a single focus pattern where you are carving one main item.
However, in many of the designs you will use in relief wood carving the elements within the pattern are unrelated. The black bear canoeing scene, below-right, provides an excellent example of a pattern with multiple elements. Many carvers will begin work on a pattern as this by simplifying the design into levels.
Begin this wood article by printing a copy of our Northwest Adventure patterns below. As you read through the steps here you will be able to refer to that pattern as your reference point.
Click here for a full sized pattern of Northwest Adventure.

Quick Glossary
Contour Pattern Planning: A way to simplify a design that is made up of repeative elements, as the Macaw is made up of basically feathers. Please see The Macaw Practice Pattern.
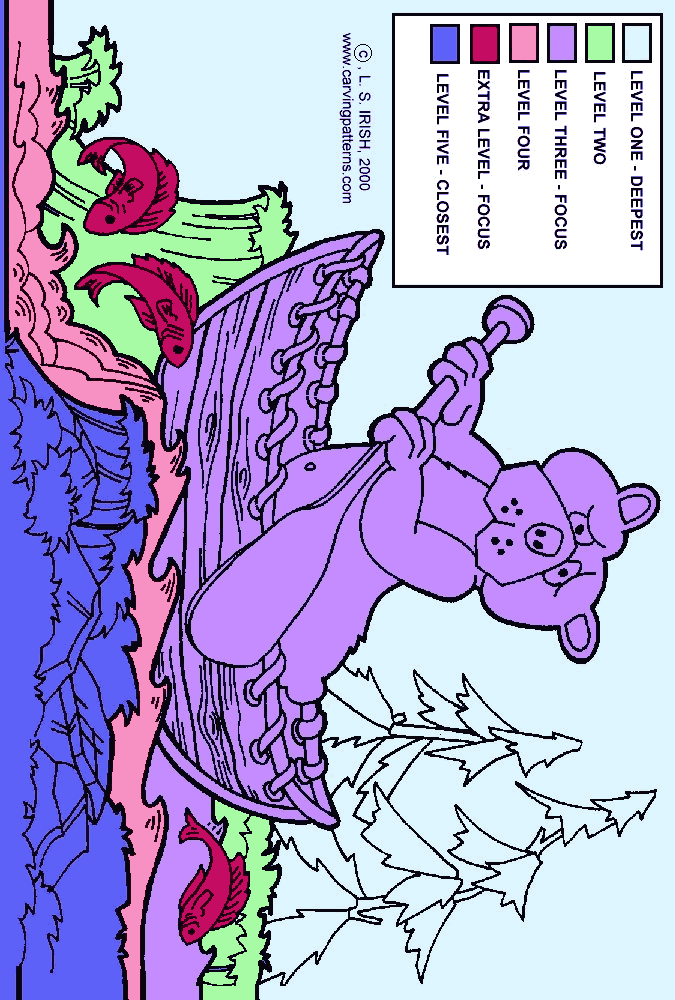
Level Pattern Planning: A way to simplify a design that is created from dissimilar elements, as the Northwest Adventure containing trees, water, the bear, fish, and a canoe.
Levels: A group of elements in the design that are placed together because of their related depth to the finished carving, as all items that are in the far background or all items that seem to be in the middle of the pattern.
Layers: Different carving depths within a level of work, the deepest part of one level, the middle part of that same level, and the highest part on the same level.
Focus Point: The element that is the main reason for the carving, the most important element within that carving.
Secondary Focus Point: Small elements within the design that need extra emphasis to accent the main focus point.

First, any relief design will have at least four layers to it. The background behind your main object, then three layers (at least) for the main focus of the scene. If there is any item lying in front of the main focus of the design, you have added a fifth layer. If there is a secondary area of focus a sixth layer will be used. In any well balance design you will have at least four layers, probably five, and maybe six levels to the design.
I do not work beyond six levels in a design. If I find that I am trying to include more than this I feel trying to bring emphasis to too many elements in the pattern.
In our Northwest Adventure scene the main focus of the pattern is the black bear in the canoe and that he is about to go over the waterfalls. There is a secondary focus area of the salmon jumping the same waterfalls. They add a little fun and contrast to the design idea … the bear is head down the falls but the salmon are working to go up the falls.
Click here for a full sized colored level guide.
I will be numbering the levels from one through six going from the back or deepest level of the carving as number 1 and the shallowest or closest level as number six. Personally, I work to keep the main focus area centered to the depth of the carving, or at level three. So for our bear this places two levels behind him and three in front.
Placing your most important element at level three creates contrast and visual comparison. There will now be items carved behind the bear as well as items lying in front.
