The Basics to Landscape Relief Wood Carving
By L.S. Irish

Landscape patterns can create many hours of fun for any wood carver. So, if you will join me, we will go through this project step by step from the original design to a finished painted carving ready to proudly display in your home.
The design to the right is a low relief carving, the knife cuts only going about 1/4″ to 1/2″ into the surface of the wood.
So the interest in a carving as this is created not in the depth of the carving but in the changing textures that are used. The sky shows the round gouge marks implying clouds, the trees are v-gouged to give just a slight impression of leaves, and the barn roof boards are cut with a bench knife. Every area of the barn design has a different textural line or feeling.
Landscape relief designs are excellent subjects for the beginning carver. You do not need to spend hours creating deep overlapping layers of work to achieve a fascinating finished project. And as you work you enjoy the chance to discover a number of techniques and strokes that can be made with your carving tools. Old barns are very forgiving to the new carver since few of the lines in the barn structure need to be precise or absolutely straight.

Click image for a close-up view.
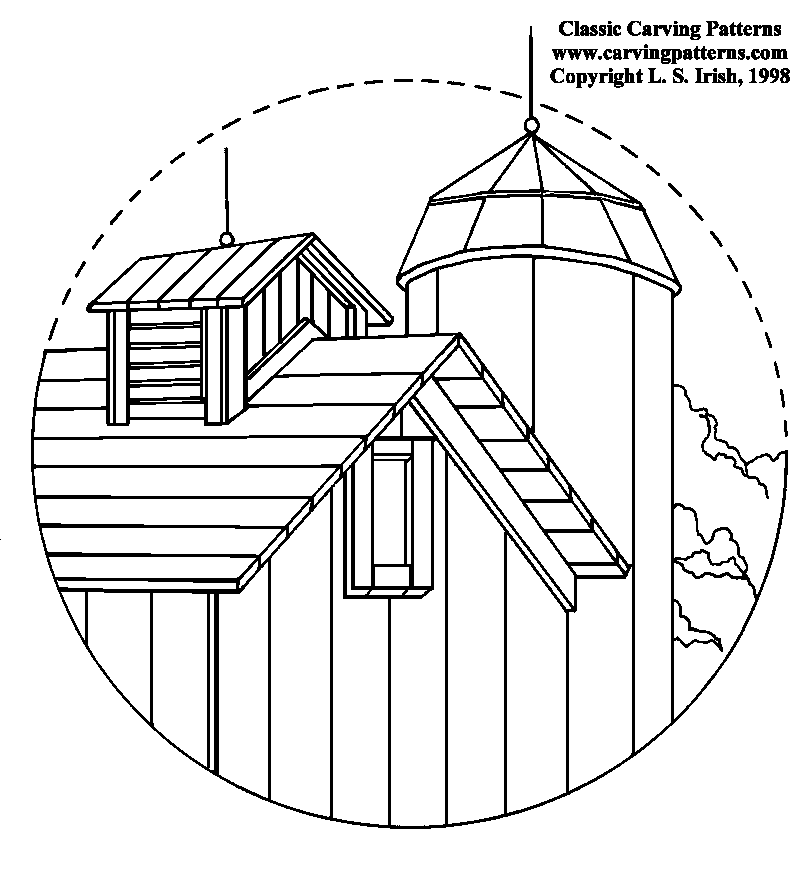
Let’s begin with a simple barn pattern as on the right. We will be using this pattern through out this tutorial.
Our barn has straight walls with a 45 degree angle roof pitch. The roof is accented with a copula which is an open vent into the roof to allow steam from the drying hay to escape. The tallness of the front wall is broken up with a small hay door and behind our barn stands a very simplistic silo. Lightening rods are added to the silo roof.
Since our pattern is just the basic structure we will begin the carving work by exploring several building material options that you might wish to use.
The Basics to Landscape Relief Wood Carving
By L.S. Irish
Roofing Ideas
The roof on our simple pattern is a slate board roof, one of the earliest ways to cover a structure. Below are four more ideas on how your roof might look.

The board and batten roof came soon after the slate roof. Here the space between the boards are covered with a smaller slate board. This not only kept the rain from entering the roof along the board joints it also directed the rain drop to fall off the edge.

A cedar shake roof can be great fun to carve. There is not only the texture of the shakes to make but also the rows of shingles. If you are making new shakes the edge of the cedar board will be very straight, but with age these shingles begin to cup and bow. As an added accent our example has lost a few of the cedar shakes letting the inside roof structure show.

Many areas of our nation used slate as their preferred roof covering. Slate like cedar shingles lets your carve several rows across your roof line. They also let you create designs. The edges of slate roofing pieces were cut into different finishes, then these pieces were carefully arranged as the roof was laid. Thus making diamond, cross, and zig zag patterns across the top of the house or barn.

Of course, tin roof are common on many barns today. Tin panels like board and batten have long vertical ribs to both direct the rain and to interlock the individual panel sections. To make a tin roof look older you can buckle some of the panel pieces or even dramatically bend edges along the soffet line.
The Basics to Landscape Relief Wood Carving
By L.S. Irish
Boards and Bricks

Old barn boards, in our area of the country are a well sought out material today. Their wonderful variety of texture and color create interesting carving features to your barn.
The earliest boards were pit sawn. A deep pit was dug so that one man could stand in the pit with the log laid horizontally over the pit opening. Another man stood on top of the log. Together they were able to cut the log into board sections. The pit sawn board has fairly straight horizontal cut lines across it’s surface. See the board example on the left.
The mill saw, often powered by a steam engine, made sawn boards much easier to produce. The circular saw blade of a milled log leaves arched lines across the face of your board. See center board example.
The third sample on the right again shows the board and batten wall. Here the boards have been reversed so that you can add even more interest to your work with mirrored saw lines. Through out the wall of your barn be sure to add a few knot holes and even well rotten areas and splits in the edges of the boards.

Mud bricks have been a reliable building material over the years. It was a readily available building material and was hand packed into wooden forms. The bricks could then be fired in kilns to harden.
With bricks, either hand packed as the upper example or manufactured as the lower example, patterns can be added to the wall.

The builders of brick barns would omit some bricks from the rows as the barn was raised. This allowed openings in the wall for ventilation. And, of course, intrigue designs were often created with the holes that where left.
The Basics to Landscape Relief Wood Carving
By L.S. Irish
Field Stone and Flag Stone

Most barns have a stone foundation in the North East, and in the New England area the entire barn structure may be created this way. The stone wall provided not only a strong building material but also easily in reach from when the farmers cleared their fields.
Field stones are uneven in size and varied in shape. In fact, they often do not fall into rows but become an interlocking jigsaw puzzle of texture in your carving. The stone in very old barn walls may have been laid without use mortar. Here the stones were very carefully fitted to each other to lock in place and the weight of the stones above kept tension on the structure for strength. Mortar, when added could be mud, mud and straw, and sometimes salt was added as a hardening agent.

Flag stone again through the Appalachian Mountains are easily acquired. This form of stone breaks into fairly uniform slabs when mined. There is still the interlocking look of the puzzle but a feeling of row structure will appear as your work.
The Basics to Landscape Relief Wood Carving
By L.S. Irish
Barn Example Drawings
Let’s put together some possible combinations for your carving pattern of the simple barn.


A quick note on the copulas, chimneys, smoke, and lightening rods!
When working on any landscape design it is important to include a few key elements into your work.
Hay barns must have a venting systems called the copula. This small structure on the roof of the barn allows air to move through the hay loft. During the late spring and summer the hay is cut and left to field dry for several days, then bailed. Hay bales are then stored in the upper section of the barn in the loft area, with the lower levels of the barn being used for livestock and equipment.
No matter how long the hay is field dried it still contains some moisture. During the hot summer days this hay will create steam that must be allowed out of the barn. Without a venting system as the copula the barn can quickly catch fire because of the extreme heat that builds up in the eves.
Copulas have over the years become an art form in themselves, being created in tin, iron, and wood with elaborate ornate work.
Old houses in colder geographical regions must have chimneys. Again, this may seem a small point but with today’s modern heating systems chimneys may not be so apparent.
The chimney to an old house was not only the main source of heat but also it was a main support structure to the construction of the home. The builder would erect the chimney first then use it to anchor the walls of the house. Old homes, 150 years and more, in the Mid-Atlantic region will have sagging floors and walls where the house has settled away from the chimney anchor.
Some homes in the New England area may have several chimneys. A home was begun by building just a basic structure that the farm family could live in as they became settled in their area. As the family grew and the farm began to prosper additions were added onto the home. With each new addition a chimney would be built to add a fireplace to that part of the house.
And finally, if you are doing a winter scene with an older house you need smoke coming from that chimney. Smoke is added just as you would a cloud behind the house. If there is no smoke there is no fire for warmth in the fireplace. If people live within the home and it’s winter with snow on the ground and bare tree branches there will be smoke coming from the chimney … no smoke no people.
Oops, even I forgot … silos get lightening rods on their roofs. The silo is often the highest structure in the barn complex so a lightening rod is added to it’s top to ground the possible strikes during a storm. On very detailed carvings lightening rods can be separately carved then glued into place after the work has been finished on the sky and tree area.
The Basics to Landscape Relief Wood Carving
By L.S. Irish
Carved Sample of the Basic Barn
Roughing out the Design

I have printed the Basic Barn Pattern with my computer printer, the finished pattern printed at 6″ square.
With landscape carving for a beginning wood worker, larger designs are easier to create. You may wish to print you pattern at the full size of your paper, giving yourself more room in the carving.
If you did not get a copy of the pattern on the introduction page to this tutorial, please click on the link below. This will open the pattern in your browser. Right hand click on the pattern and click “Save Image”. To return to the tutorial just click back on your toolbar.
The pattern has been traced on to a 3/4″ piece of sanded basswood.
I begin the design by roughing out the basic levels of the design using a bench knife, 3/8″ rounded gouge, 1/8″ skew, and 1/4″ skew.
The highest point on the barn is the front corner of the roof line. This area remains un-carved at the original level of the wood. The second highest level point on the design is the corner intersection of the barn walls, note where it almost touches the original level of the basswood. The deepest points in the carving are along the sky line where the air meets the barn roof and silo.
All of the carving work slopes away from the roof corner and wall corner dipping down to where it touches the circle that hold this pattern. The deepest area, the sky between the copula and the silo is about 3/8″ deep. Personally, I do not like to carve deeper than one half the width of the board that I am carving.
After every level is established I will lightly use the gouge and 1/4″ skew to smooth out each section of the work.
The Basics to Landscape Relief Wood Carving
By L.S. Irish
Carved Sample of the Basic Barn
Adding the Detail Work

Once the basic levels have been established you are ready to begin the detail work. Chose which barn building materials you wish for you landscape. I have chosen a field stone wall with a board and batten roofing. The silo will be built using wood slates with barrel bands. And I have added a few more trees to the background of my design.
I prefer to pencil in the detail work before I begin carving. Each area can easily be changed if necessary as I work, yet the pencil marks let me preview the overall image and become guidelines for each area.
After the carving is complete you can erase any pencil marks left using a white vinyl eraser. Please, do not use a common pink eraser for this step. Occasionally the pink eraser dye will stain your carving and can not be removed except by shaving your work with a skew or gouge.
For this pattern I particularly like the variety of line directions that have been established. There is a vertical feeling to the silo to emphasize it’s towering height. The roof shows it’s diagonal slope with the board and batten ribs. The under structure of the roof lets me put in a few horizontal lines. All accented with the random interlock of the field stone.
I have added to my tool selection a 3/8″ skew, a micro round gouge, a brass wire brush, an old toothbrush, and a fine chip knife.
The detail carving is begun with my bench knife to cut the under structure of the roof. First cut in two lines, one for the soffit board at the outer edge of the roof line and the second is the trim board where the roof meets to wall. The spaces between the horizontal slates are next v-cut, again using a bench knife.
The field stone is now done using a fine edged chip knife or your bench knife. Just as with the slates under the roof, I am not carving the stones but am instead cutting out the mortar area that surrounds each stone. Once the stones around the window opening are established drop down the window into the wood with one of you small skews. This gives a feeling a depth into the barn. Occasionally, round over the edge of a larger stone for interest.
As I work I use a brass wire brush to remove the splinters and whiskers that may occur, the toothbrush removes the excess of chips that build up over the design. Keep your line carving work varied in both depth and width to add interest as you work. Continue your carving into the wood slates on the roof, the wooden boards and barrel bands on the silo and the vents in the copula window.
Now using the micro gouge detail the tree line in a random pattern. The background sky is smoothed using my large round gouge.

In this close up view you can see the v-cuts created with the chip knife in the field stone and board slates. The skew has been used to lower the window into a flat plane. The micro gouge leaves it’s distinguishable marks in the tree line. The knot hole was cut by “rolling” a small round gouge into the wood, then lifting the piece out with a small skew.
 Brick walls are easy to lay out and carve. First create evenly spaced rows along the front and side walls of your barn. Next divide each row into the width of each brick, staggering the divisions with each row by one-half brick.
 Old barns often had hand-sawn rough boards for both the walls and roof. Vary the width of each board and allow for gaps between the boards to give this rough sawn look.
The Basics to Landscape Relief Wood Carving
By L.S. Irish
Carved Sample of the Basic Barn
Finishing Details

Dry Brushing with Oil Paints
Materials:
- Artist Oil Paints
- Van Dyke Brown
- Burnt Sienna
- Yellow Ocher
- Cobalt Blue
- Lamp Black
- Terra Green
- Cadmium Yellow Med.
- Titanium White
- Assorted soft brushes
- 3/8″ flat
- detail liner brush
- Turpentine
- Linseed Oil
- Lint free cloth
- Ceramic glazed tile
Instructions:
- Dust your carving well to remove any chips or splinters from the corners of your work.
- Mix approximately one tablespoon of turpentine with one teaspoon of linseed oil, add just enough Van Dyke Brown to this mix to make it look like dirty dish water. See the un-carved area surrounding our carving for color tone.
- Flood the carving with the Van Dyke mixture being sure to get into all of the crevices of your detail. Apply a second coat immediately. This mixture is meant to saturate the wood with the turpentine/linseed oil mix so that your oil paints will apply smoothly.
- Place a small amount of each of your oil colors on a glazed tile. The glazing on the tile allows even loading of the brush with color and can be quickly cleaned with turpentine when your are completed the painting.
- Basic dry brushing: The technique of dry brushing is used to apply extremely small amounts of color at a time to a detailed carving. Since there is very little color as the brush bristles are pulled across the surface of the work color adheres only to the high areas allowing your dirty Van Dyke mixture to remain in the deep crevices.Hold the brush at a slight angle to the carving and gently pull the tip over the top of the work. Do not scrub down into the depths of your design.Dampen a 3/8″ or 1/4″ flat brush, either sable or bristle will do fine, with clean turpentine. Blot the brush well on a clean cloth so that there is extremely little turpentine remaining in the brush. Pick up just a very small amount of color on the edge of the bristles then work the color deeply into the brush. You should be able to see the individual brush hairs in the color on the brush. If you can’t you are carrying too much color. Now caress the top surface of your design allowing the color to highlight the ridges of your work.Colors may be dry brushed several times to any one area to build up your color tone. Colors may also be intermixed, adding layers of different colors for both shading and color change. Use some colors in a random ‘hit and miss’ approach for color interest.
- Base Color Area Application:
- Field stone wall: titanium white, yellow ocher, and a mix of cobalt blue, black and white for a stone gray look
- Board and batten roofs: yellow ocher, burnt sienna, and Van Dyke brown
- Silo boards: yellow ocher, burnt sienna
- Silo roof: titanium white and the mixture of blue gray from the walls
- Tree line: Terra green, yellow ocher, and cadmium yellow medium
- Sky area: a mixture of cobalt blue and titanium white to a pale blue tone
- Adding shadows to your painting will emphasizes the deep areas of your carving. Dry brush Van Dyke brown under the roof eves all along the top of the stone wall. Lightly add a second coat to the barn wall that does not have the window vent. The under structure of the roof is heavily accented with Van Dyke as is the roof line area that it touches. Add shadows under the copula roof. The silo is shadowed on the side that touches the barn and under each of the barrel bands. Again, very gently, hit the same side of the silo roof with Van Dyke brown.
- The tree line is shadowed with a mixture of Terra green, cobalt blue and Van Dyke brown. Use this mix to dry brush where the tree line touches the barn and silo and where one area of trees lies behind the other tree line.
- Use a thin mix of Van Dyke brown and turpentine to paint in the window vent in the barn, the window vent in the copula and the knot holes in the barn roof.
- Highlights will finish the painting. Use titanium white along the face of the wall with the window vent. Add a second coat to the stones around the window vent and along each of the wall corners. Apply at random a little white to the edge of the roofs to emphasize the broken boards. The knot holes are also gently touched with white. Add a brush width of white highlight to each barrel band on your silo on the right side and accent the right side of the silo roof. The tree line tops are randomly accents also.
- Sign your initials or name and the date to the design.
- Allow the work to dry completely, with oil paints a couple of weeks is appropriate. Your may add a light coat of spray matte sealer to the work if your wish, but a varnish or oil finish is not necessary.
