Sailboat Basic Carving Techniques Tutorial
By L. S. Irish
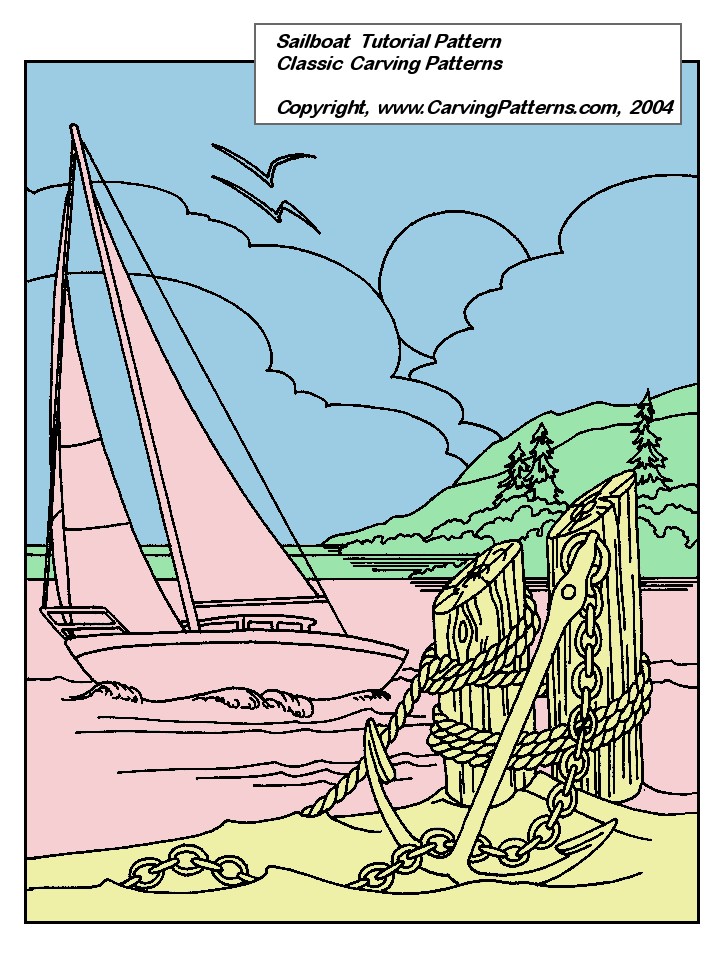
Low Relief Sailboat Wood Carving Scene
TOOLS AND MATERIALS NEEDED FOR THIS PROJECT
- 9″ x 12″ pre-routed wood carving plaque. You may chose either basswood or butternut.
- Basic Wood Carving Tool Set that includes a round gouge, v-gouge, straight chisel, skew chisel, and veining gouge
- Basic Bench Knife
- Typewriter Carbon Paper
- Steel Ruler
- Fine Grit Sand Paper
- Assorted Fine Files or Dental Picks
- Spray Polyurethane
- Oil Based Wood Stain (optional)
My wood form is a pre-routed butternut plaque, 9″ wide by 12″ long and 5/8″ deep. Basswood, probably the most common wood used for relief carving, would also be an excellent choice for this project as it has a very tight grain that allows for fine detailing. Butternut is a wood with a more defined grain than basswood. This means that my detailing is slightly limited in comparison. Also the grain of the wood will be very visible once the carving is complete.
WORKING WITH YOUR PATTERN

Carving begins with a design or pattern that is traced onto the wood surface as a carving guide. For this tutorial we will be using an ocean beach overlooking a small jetty of mountains with a Sailboat as the focus point. This pattern prints out to a design area of 6 1/2″ wide by 9″ tall. The printed dimensions can vary according to your printer’s settings.
Please click on the pattern image to your right. This will open a new window in your browser with a large copy of this Sailboat Pattern. Print several copies of this pattern; you will need one for tracing, one for establishing levels, one to cut into sections, and one to save in your carving patterns file.
You can also ‘Right Hand Click’ on the large pattern and select ‘Save As’ to place a digital copy on your computer’s hard drive. Save the pattern somewhere in your computer directory where you will be able to find it later, the Desktop is always an excellent choice. By saving this pattern to your computer you can resize the image with a graphics program to fit other wood forms with different dimensions than the one used here.
WORKING WITH A LEVELS MAP
Use one of the printed patterns to create a map of the different levels found within the design. By grouping elements and areas within a pattern into levels you can easily control the depth of your scene. Once the elements are grouped then each level area is roughed out as a whole unit to drop every element in that level to a specific depth in the wood.
The pattern has been divided into four levels. Starting at the deepest point in the design I have grouped the sky, clouds, and sun as level 1, shown in blue. Level 1 is the deepest areas in the patterns. The next grouping includes the mountain ridge, trees, and the water behind the sailboat. This is level 2, shown in green. Level 3 includes the sailboat and all of the water in front of the boat, shown in pink. The final level, level 4, contains the posts, rope, anchor, and sand noted with yellow.
I use colored pencils to establish a level map on one of the printer patterns when I work. I will refer to that map during the rough out stages, shaping stages, and detailing of the carving.
For more information of establishing levels in your pattern, please see:
Simplifying a Pattern ( Free Macaw Pattern)
Working with Levels (Free Bear Pattern)
BASIC CARVING TOOL SET
There is a wide selection of carving tools available to the craftsman with varying shapes and sizes of blades and differing handle designs. As you progress in your enjoyment of this craft you tool kit will increase as you purchase specific tools that you find usable for your style of carving.
For this project we will be using the most basic of carving tools, including the Bench Knife, Chisel, Skew Chisel, Round Gouge, V- Gouge and Veining Tool. All of the tools used for the Sailboat can be found in a beginner’s wood carving tool set, the Macro Long Handled Tool Set. You can also use the Japanese Short Handled Set, Japanese Long Handled Set or the Macro Palm Set. The prime consideration between these four carving tool sets for a beginning carver is the handle shape and how comfortably the tool rests in your hand during the work.
For more information of available Carving Tools Sets, please see:
Basic Carving Tools
The Beginner’s Tool Kit

Bench Knife
The Bench Knife has a long narrow blade with a sharpened edge along the lower side of the knife. It is used to create spot cuts, rounding over, and whittling. A variation of this tool is the Detail Knife with a very finely pointed narrow blade.
- Stop Cuts
- Rounding Over

Chisel
Chisels have only the final edge of the tool sharpened, the end will be cut in a flat square end. These flat blades are used for the stop cut in relief carving, for removing large areas, and for crisping corners. They are also excellent for scraping the final surface of your work to leave a clean smooth finish.
- Spot Cuts
- Rounding Over
- Smoothing or Finishing
- Shaving

Skew Chisel
Skew Chisels have an angled end to the blade that lets you lead into the carving stroke. This is an excellent tool for cutting sharp corners. The main use of the chisel is for removing large sections of wood when you are establishing the levels in the early carving.
- Roughing Out
- Rounding Over
- Smoothing or Finishing
- Cutting Sharp Corners

Round Gouge
The full length of the blade is rounded into a c-curve. The final edge of the blade is sharpened to slice out the wood. Gouges remove great quantities of wood at a time and so are used to do the rough cutting in carving.
- Roughing Out
- Cupping or Shaping Areas

V-Gouge
This tool comes to a sharp “v” point at the tip creating a deeply scored line in the wood. “V” gouges are available in a variety of angles from very tight “v”s to widely open “v”s. Use this one to carve along joint lines in the design and for detailing.
- Stop Cut Joint Lines
- Detailing

Veining Tool
Tightly rounded into a u-curve, veining gouges are also called veining tools or parting tools. This tool cuts a narrow rounded channel and is used for joint areas and detailing.
- Stop Cut Joint Lines
- Detailing
I am taking woodcarving classes at our senior center with an excellent instructor. He is a retired occupational therapist and has been teaching carving for 40+ years.
I found your website while looking for my next carving project and have found several tutorials that are very interesting. My next project will be your sailboat tutorial. This is fitting since I have enjoyed sailing and am a Navy veteran. The tutorial is excellent, but very long. Is it possible to download the instructions and print them out? I am 81 and find it easier to work with instructions that have been printed.
I have found your web site to be very helpful and well set up. Thanks for your dedication to woodcarving.
Paul