Sailboat Basic Carving Techniques Tutorial
By L. S. Irish
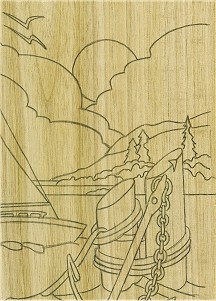
Pattern Work, Roughing Basics
TRACING YOUR PATTERN TO THE WOOD
The size of the plaque determines the size of the pattern used. Note that the pattern was sized to be about 2″ smaller than the width of the board. This gives me room for a border area and space between the sides of the pattern and the carving area of the plaque.
Every pattern has it’s own specific needs when placing it onto your wood form. With this pattern you need to note that you will be carving water. Water is always level! The contours of the shoreline may change, there may be ripples or waves, but the water as a whole can not slant to one side or the other. On your pattern there is one long water line just below the background mountains. This is the line that needs to be level around the face of your plaque.
A second consideration for this pattern again revolves around the longest water line. This design is cut into two sections, the area above the horizon water line and the area below that line. I don’t want that line to fall exactly in the middle of the height of the plaque. This would visually cut the wood in half. Instead I want it either above or below the middle mark on the face of the wood.
I chose to place the water line below middle. If I were going personalize this carving with a name or specific boat then I would have moved this line above middle to allow room at the bottom for the lettering. So I have made a pencil mark 4 1/2″ up from the bottom on the face of the plaque. When I taped the pattern in place these two marks were used to guides for the longest water line in the pattern.
I have marked two lines along the outer edge of the face of the plaque. The first is 1/4″ from the routed edge and the second 1/2″ from the routed edge. This will give me guide lines later where I can create a tapered cut from the face of the board into the carving area.
I have cut the pattern to allow the pencil marking I made on the plaque to show, then taped the pattern onto the wood on one side of the paper. Typewriter carbon paper is placed under the printed pattern and an ink pen is used to trace over the lines. Carbon paper is available at most office supply stores.
When you are working with levels in the early carving stages you do not need to trace every detail of your pattern. Just the outline of that level area is necessary. However, out of old habits, I still trace everything at this point. Even though I know that I will be quickly carving away most of the tracing this lets me think about that image that I will be carving and how each element is placed next to another element.
Here is the completed tracing of the pattern. Carbon paper leaves a soft gray black line that does not smudge as pencil graphite does.


For more information of transferring your pattern to the wood, please see:
Transferring the Pattern
Pounce Patterns
Enlarging & Reducing
WORKING WITH THE GRAIN OF YOUR WOOD
BASIC ROUGHING OUT CUTS
Roughing out the four different levels in the pattern is the first carving work done for this pattern. The work is done from the deepest point in the design, level 1, through to the highest points in level 4. So the carving starts with the sky area and ends with the posts and anchors. Each area will be carved down into the board then given a general smoothing.
The roughing out process is generally the same for each level. First the outline of the level is carved with the bench knife to create a stop cut. The bench knife is held upright to the wood to make as vertical a cut as possible. Use a chisel or round gouge to begin removing the excess wood. Work these tools as much as possible with the grain of the wood and with the carving stroke ending at the stop cut. When the chisel or gouge reaches the stop cut the stroke is complete and the wood chip will lift out.
Carving strokes that go as closely as possible with the wood grain will be smooth even cuts. Those that go against the grain tend to be ragged as they tear the wood instead of cut the wood. Against the grain cuts can also pull your knife deeper into the wood plaque then you intended. This causes splintering or sections of grain to be lifted with the knife cut.
A wood carving does not have to be worked right side up! You can turn the wood plaque at any time in to position so that your stroke is going with the grain.

I am taking woodcarving classes at our senior center with an excellent instructor. He is a retired occupational therapist and has been teaching carving for 40+ years.
I found your website while looking for my next carving project and have found several tutorials that are very interesting. My next project will be your sailboat tutorial. This is fitting since I have enjoyed sailing and am a Navy veteran. The tutorial is excellent, but very long. Is it possible to download the instructions and print them out? I am 81 and find it easier to work with instructions that have been printed.
I have found your web site to be very helpful and well set up. Thanks for your dedication to woodcarving.
Paul