
Since this seminar is all about how to incorporate multiple hobbies into one project, during this posting we will be using colored pencils to create skin coloring for our scroll saw cut, wood burned Wood Spirit face.
You might like to visit another one of our colored pencil – pyrography project, Coloring your Wood Burning Projects.
Cross-Crafting Seminar Introduction
Cross-Crafting Seminar Supply List
Cross-Crafting Seminar Free Patterns
Cross-Crafting Seminar, Scroll Saw Basics
Cross-Crafting Seminar, Setting Up Your Scroll Saw
Cross-Crafting Seminar, Scroll Sawing the Wood Spirit Face
Cross-Crafting Seminar, Wood Burning the Wood Spirit Face
Cross-Crafting Seminar, Colored Pencils for the Wood Spirit Face
Supplies:
There are several excellent brands of colored pencils that we can use in pyrography. I strongly suggest that you invest in an artist quality or artist grade set. Student grade or school grade colored pencils, as those that come with the new Adult Coloring Books are often chalk-based and do not apply to wood in a smooth, easy to blend layer. Artist quality pencils are wax-based or watercolor-based, apply easily and evenly across your wood, paper, and even fabric.
The following are a few of my favorites, available at Amazon.com and I do mix and match manufacture brands in any project!
Prismacolors are my favorite for watercolor paper, vellum, and chip board colored pencil work. These have a soft wax core, blend easily, and will leave a nice, rich coloring with light strokes.
Prismacolor Premier Colored Pencils, Soft Core, 48 Pack
Prismacolor Watercolor Pencils
I use my Derwents for adding coloring to wood burnings on wood. Derwents have a harder core than Prismacolor and are perfect for getting into the tight wood grain and deeply scored pyrography detailing that some of our wood burnings have.
Derwent Colorsoft Pencils, 4mm Core, Metal Tin, 24 Count
Derwent Drawing Pencils, Inktense, Watercolor, 24 Per Pack
Lyra is a must-have for anyone who does a lot of skin tone work. This pack has twelve extra-large pencils in the most common skin colors. No mix, no mess, just chose the shade for your shadows, highlights, and general skin tones.
Click on any image for a large photograph.
Lyra Color Giants Skin Tone Colored Pencils
 Step 1 Since my wood spirit will become the end caps to a small, outdoor bird feeder I have chosen basic, strong colors for my project’s skin tones. As we work through these steps you will be able see how working one color of pencil over another creates new color hues in your project.
You do not need a large set of pencils. A set between 12 to 24 is enough colors to create a wide range of hues by working one color over another.
Note: Colored pencils apply best when laid down in light-pressure, thin layers, not heavy-pressure one-step coloring. Thin layers allow the wood burning shading to clearly show through the hues and can be developed with additional layers to create deep, rich color tones.
Keep your pencil points sharp so that the point can easily reach into the fine crevices of the burned strokes and wood grain.
New colors can be created by working thin layers of one color over another color. For best results apply the darker toned color first then lay the paler color tone on top.
 Step 2 We may refer to skin colors as white, yellow, red, brown, or black, but all skin colors are simply shades of orange. All humans have orange colored skin! Some of us may have pale white-orange skin, and others a red-orange tone, and some such a deep coloring of orange that it appears almost black … but everyone of us is orange!
To learn how to get that perfect skin color every time. please read Adding Skin Colors to Wood Burnings. It is an in-depth look at the mixing color hues to get just the right shade of orange for your portrait.
The base shadow color for my wood spirit is black cherry – a rich, deep red-purple. Work several light layers of black cherry over the areas of shading in the face that you created with your wood burning steps.
Since all skin tones are shades of orange, we are using a purple-toned colored pencil for a our base shading step. Purple is the compliment to orange and when the orange pencil is worked over this purple shading the finished coloring will be a rich shade of brown.
Let your pencil lines show, let them go in random directions, and keep the pressure on the pencil tip light. The random lines add to the wild look of the wood spirit.
 Step 3 Since I want my wood spirit wild and woolly I am adding more shading over my base of black cherry using a deep ultramarien blue colored pencil. Work several light layers of ultramarine blue in the same general areas as the pyrography shading on the face, but do not cover up all of your black cherry work.
Skin is transparent, while it does have pigment you can see through the skin to the vein and bones in the body. Blood veins often have a bluish cast under the skin, so in our wood spirit we can use the ultramarine blue to pick up that effect.
Just as we allowed the wood burning shading of the face to move into the hair strand area, take some of this colored pencil shading into those same areas.
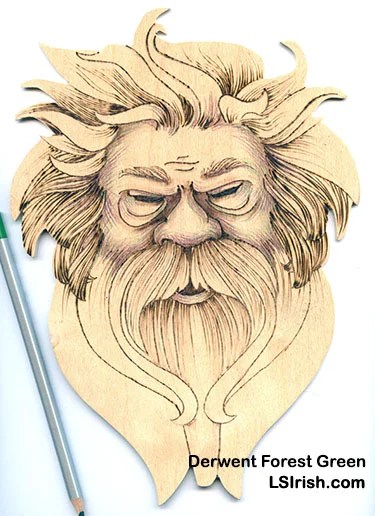 Step 4 A couple of light layers of forest green shading blends the shadow areas of the face. Note in the photo that no area of the shading now has one individual strong coloring, but instead has a speckled, blended effect. Green works just as tones of blue in portrait coloring, implying the under-structure of bone and veins.
 Step 5 Now that you have the shadows well established in the face it is time to overlay the general skin tone. I used a medium rust-brown pencil for this general overlay. Apply several light layers of coloring to the face. Allow some areas of the original wood uncolored to create your highlights – the center of the forehead, the outer corners of the upper eye lids, the center of the eye wrinkles below the eyes, the center line of the nose, the center of the cheeks, and the center of the mouth.
As with all of the other colors, work these layers of skin tone directly over your previous colors, and expand your coloring area towards the areas that you will leave as highlights.
Two light coats of this general skin tone is also applied to the mustache and beard area of the face to give it just a touch of color toning.
 Step 6 Several light coats of orange is applied to the entire face – over the shaded areas and the highlights. This orange is what gives the skin its warmth, makes it feel alive.
Step 7  I decided that I wanted my wood spirit to have a darker base coloring to his skin tone. So I have added a few layers of a darker brown skin colored pencil.
 Step 8 My highlights in the face as of Step 7 are in bright orange. To add those bright reflective spots on the high areas of the face I use Titanium white. Again, use freely moving strokes and let your pencil lines show.
In this photo you can note that my pencil is two-toned. When a colored pencil becomes to short to place in the pencil sharpener or too short to hold comfortably, simply super glue the blunt end to the end of another pencil!
 Step 9 I want my wood spirit to have grey-white hair, so I will be using the coloring of the birch wood as my base color for all of his hair and beard.
To create individual strands of hair I used the Titanium white pencil, and worked long, curving lines of white from his face towards the outer edge of the hair area.
This white is worked in those hair strands that are closest to you, on top of other strands. Click on the image for a close-up.
 Step 10 Using a medium grey or french grey colored pencil I have added more hair lines into the mid-ground and background hair strands. Again, let your pencil lines show.
 Step 11 My last step is to intensify the white throughout the wood spirit’s face and hair. As this is the last layer of colored pencil work I can add extra pressure to the pencil to create thicker line work.
Once the coloring is completed I give my wood burned colored pencil projects a light coating or Reworkable Spray Fixative. This is a matte toned finish that protects the work you have already accomplished but that also allows you to add more colored pencil work over your piece.
This protects the work I have done while I decide what final finish I may want for the project. Since this scroll saw wood spirit and its matched gang-cut piece will become the end pieces for my small bird feeder, it will eventually be finished with polyurethane after it is attached to the feeder.
Thanks for reading ….. tomorrow we will be working on scroll saw cutting our wooden spoon and the wood carving steps for that project. See ya’ there!


